

UPD 23.04.2025: MITRE created a page for Operation Triangulation as part of its ATT&CK framework.
In the beginning of 2023, thanks to our Kaspersky Unified Monitoring and Analysis Platform (KUMA) SIEM system, we noticed suspicious network activity that turned out to be an ongoing attack targeting the iPhones and iPads of our colleagues. The moment we understood that there was a clear pattern in the connections, and that the devices could have been infected, we initiated a standard digital forensics and incident response (DFIR) protocol for such cases – moving around the office, collecting the devices, and inspecting their contents. The ultimate goal was to locate and extract the malware, to find the point of entry (hopefully, a 0-day) and to develop a protocol for scanning the iDevices for active infection. That process turned into a months-long journey, and in this article we would like to summarize it.

First steps
As we mentioned in the very first article on Operation Triangulation, the infected devices that we knew about initially, belonged to Kaspersky employees who worked in the HQ office in Moscow. All these devices were connected to the corporate Wi-Fi network, which allowed us to record and inspect the network traffic. After spending some time investigating with Wireshark, eventually we found the following:
- Right before exhibiting the suspicious behavior, the devices connected to the iMessage servers usually responsible for receiving messages and downloading attachments;
- After downloading a few kilobytes of data that could have been an attachment, the devices established a connection to the server backuprabbit[.]com, exchanging data with it over a course of less than a minute;
- Next, the devices connected to one of the following servers for a longer session:
- cloudsponcer[.]com
- snoweeanalytics[.]com
- topographyupdates[.]com
- unlimitedteacup[.]com
- virtuallaughing[.]com
- Once the device rebooted, all the suspicious activity stopped.
Unfortunately for us, all the communications with the servers in question happened over HTTPS, so we could not recover any additional details from the traffic.
Device imaging
Since all the devices were literally within hand’s reach, the obvious next step for us was to inspect their contents. Unfortunately, it was a dead end: available forensics acquisition software at the time of research was based on checkra1n and similar exploits that did not work for modern processors running iOS 15 and 16.
Examining backups
What we decided to do next was to use iTunes backups of the devices as a substitute for complete device images. This procedure had to be done with a fair amount of secrecy so as not to scare away the attackers. Since we did not know about the exact capabilities of the attackers, we assumed that they were listening to the microphones of the devices, and reading e-mail messages and messenger conversations. So, we had to arrange our meetings in person, putting the phones in airplane mode, and sometimes in Faraday bags. We used the excellent tooling from libimobiledevice to acquire the backups, and inspected them by building a timeline of events with the Mobile Verification Toolkit.
Such a timeline combines file system timestamps with data records extracted from various system databases. We focused on the iMessage directories, because we knew that in 2021 Citizen Lab researchers had found the infamous FORCEDENTRY exploit by examining files in these directories. We wanted our analysis to be as fruitful – but the attackers behind Operation Triangulation turned out to be very stealthy, and we found no signs of exploits in the backup. We also searched it for malware executables, which we were also unable to find.
We had additional data points – the timestamps of suspicious network activity. So, we started to look for any repeating events in the timeline that happened around the same time. As a result, we found what looked like a new indicator: data usage records mentioning a system process named “BackupAgent” that should not have been executed at all – the binary was deprecated years before.
|
1 2 3 4 5 6 7 8 9 |
2022-09-13 10:04:11.890351Z Datausage IMTransferAgent/com.apple.datausage.messages (Bundle ID: com.apple.datausage.messages, ID: 127) WIFI IN: 0.0, WIFI OUT: 0.0 - WWAN IN: 76281896.0, WWAN OUT: 100956502.0 2022-09-13 10:04:54.000000Z Manifest Library/SMS/Attachments/65/05 - MediaDomain 2022-09-13 10:05:14.744570Z Datausage BackupAgent (Bundle ID: , ID: 710) WIFI IN: 0.0, WIFI OUT: 0.0 - WWAN IN: 734459.0, WWAN OUT: 287912.0 |
Anomalous activity from the BackupAgent process observed in device logs – we shared this snippet in our first post on Operation Triangulation
Based on the discovery of this anomaly, we wrote a first version of our triangle_check tool. It allowed us to quickly confirm if a device’s backup contained traces of potential compromise.
Trying to intercept the malicious iMessage
Looking further into the event timelines, we discovered a second weak indicator: modification of an empty SMS attachment directory (one or several) prior to data usage by the BackupAgent process. Since the directory is modified but contains no files, that usually means with a high degree of confidence that the last operation was file deletion: there was an incoming attachment, it gets deleted, and seconds later a process named BackupAgent is running suspicious networking code.
Since the threat actor behind Operation Triangulation seemed to be smart enough to remove the malicious attachment from infected devices, we decided to try and capture the incoming message during the iMessage delivery process. While looking for a way to intercept iMessages, we found this Frida script coded by the Google Project Zero team. IIt is designed to run on a Mac, so we took a spare Mac mini and installed Frida on it. We then asked several of our targeted colleagues to log in to that Mac mini with their Apple IDs. By doing that, we were able to monitor and intercept iMessages that they received. All that we needed to do next was to wait until the attackers infected one of our colleagues’ devices once again.
At the same time, we were actively monitoring SIEM logs for the traces of suspicious activity. Soon enough, we detected familiar network connections that indicated a successful compromise of a phone with a “cloned” iMessage account. However, when we checked the iMessage interception logs on the Mac mini, we identified no traces of messages at the time of infection. Thus, our system was failing to capture the message that could have contained an exploit (we still don’t know why it didn’t work), so we started to seek other ways of capturing the malware.
Good old MITM
After the plan to intercept iMessages through a Mac device failed, we decided to try to decrypt HTTPS communications with the C2 servers previously identified from traffic analysis.
To do that, we:
- Set up a Linux server and installed mitmproxy, an HTTPS interception tool;
- Installed a root SSL certificate (that we previously generated through mitmproxy) on several iOS devices that were known to be compromised before;
- Installed a Wireguard VPN client on these devices and configured them to use our mitmproxy instance as a VPN server.
We also developed a Telegram bot that would notify us whenever one of the monitored devices became infected:

Unfortunately, this method did not allow us to intercept HTTPS traffic of Apple services (including iMessage), as iOS implements SSL pinning for this. Thus, we were not able to decrypt iMessage traffic that came through the VPN.
Catching the JavaScript validator
Once the attackers reinfected one of the targets, we looked in the mitmproxy logs, noticing that it managed to decrypt the C2 server traffic:

We expected the payload that we managed to obtain to be an exploit for iOS. However, it was the JavaScript validator, which simply collected information about the victim browser and sent it to the C2 server.
We observed the infected device receiving a payload in response to the validation information sent to the C2 server. However, while we were able to intercept HTTPS traffic, we could not decrypt it. That is because the JS validator implements its own layer of encryption for C2 communications, using the NaCl library. The encryption algorithm used is based on public-key cryptography. Specifically, to communicate with the C2 server, the JS validator:
- Generates a random key pair (consisting of private and public key);
- Derives a shared key from the generated private key and the C2 server’s public key;
- Uses this shared key to encrypt messages sent to the C2 server and decrypt the ones received from it.
|
1 2 3 4 5 6 7 8 9 10 11 12 13 14 15 16 17 18 19 |
var o = function (t) { function u(t) { this.D = nacl.box.keyPair(); this.L = nacl.box.before(t, this.D.secretKey); } u.prototype.encrypt = function (t, nonce) { return nacl.box.after(t, nonce, this.L); }; u.prototype.decrypt = function (ciphertext, nonce) { return nacl.box.open.after(ciphertext, nonce, this.L); }; u.prototype.N = function () { return nacl.randomBytes(nacl.box.nonceLength); }; u.prototype.k = function () { return this.D.publicKey; }; return new u(t); }(h.values.R) |
Key generation
In order to decrypt the C2 server communications, it is necessary to know the private key that was randomly generated by the JS validator. However, this key is kept in memory and is not sent to the C2 server. And so we had to do some additional work in order to decrypt the validator’s traffic.
As demonstrated by the screenshot above, the JS validator generates a random key pair by invoking the nacl.box.keyPair() method. To decrypt the traffic, we decided to compromise the process of generating this keypair. Specifically, we coded a tiny mitmproxy add-on that looked for invocations of the nacl.box.keyPair() method. It then replaced them with another method, nacl.box.keyPair.fromSecretKey(), that initializes a keypair from a provided private key.
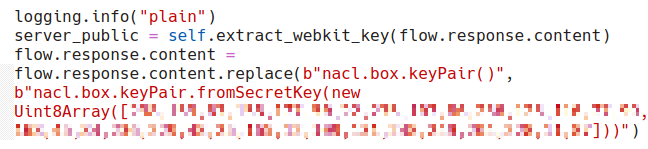
As can be observed from the screenshot above, we hardcoded a private key into the arguments of this method, thus backdooring the validator’s encryption scheme. Once the backdoored validator was executed on the infected device, it became possible to decrypt all communications of the JS validator.
The binary validator and the hint about the attachment
Once the attackers reinfected one of their targets, we were able to analyze the payload further executed by the validator. It turned out to contain two exploits: one for WebKit and the other for the iOS kernel. The ultimate goal of those two exploits is to launch the binary validator stage on the target device.
As we described in the article covering the stealth of Operation Triangulation, the binary validator contains a function that cleans up traces of the malicious iMessage. Specifically, we found out that this function makes the following SQL request to the SMS.db database:
|
1 2 |
SELECT guid FROM attachment WHERE uti == "com.apple.watchface" AND LENGTH(transfer_name) > 32 AND INSTR(transfer_name, CHAR(0x2013)) == 9; |
The condition ‘uti == “com.apple.watchface”‘ gave us another hint: now it became clear that the malicious attachment is a .watchface file. And so, with a little bit more information about the attachment, we planned and executed the next attempt to obtain it.
Exploring iMessage
In order to devise another strategy for getting the attachment, we decided to study the process of sending iMessage attachments in greater detail. It turns out that this process consists of the following steps:
- The sender generates a random AES key and encrypts the attachment with it;
- The encrypted attachment is uploaded to iCloud;
- The iCloud link to the encrypted attachment is sent to the recipient along with the AES key, which is additionally encrypted using the device’s public RSA key.
Thus, to obtain the malicious attachment file, we had to retrieve two components:
- The ciphertext of the attachment;
- The AES key used to encrypt it.
It is quite straightforward to obtain the attachment ciphertext, as it is possible to intercept traffic to the iCloud servers through mitmproxy. Previously, we wrote that iOS does not allow decryption of HTTPS traffic of Apple services. However, iCloud attachment links turned out to be an exception to that rule.
At the same time, the process of obtaining the AES key is quite difficult. It is sent over the iMessage protocol and so cannot be intercepted through mitmproxy. However, we discovered a way to recover the attachment and to extract this key using physical access to the target device. We prevented iMessage from successfully downloading the attachment using the iCloud link, so that the exploit would not activate and then delete the attachment, but the AES encryption key would be stored in the SMS.db database.
We decided to change a few bytes in the attachment ciphertext using our mitmproxy add-on. By doing that, we disrupted the process of downloading the attachment ciphertext, and the decryption key was kept in the SMS.db database. We then downloaded an iTunes backup of the infected device and extracted the key from the database inside this backup. As a result, we obtained the malicious .watchface attachment sent by the attackers – that was the beginning of the exploit chain used to compromise the devices.
Getting the implant
After we finished obtaining the exploits used by the attackers, all that remained was to get the implant itself. The binary validator is the component responsible for downloading and activating the implant payload from the C2 server, and it uses a combination of RSA and AES for communications. Again, the use of RSA means that it is impossible to decrypt the implant payload by having only the ciphertext traffic.
To exchange data with the C2 server, the binary validator:
- Generates a random AES key;
- Encrypts the generated AES key with the server’s RSA public key specified in the validator’s configuration;
- Encrypts the message to be sent to the C2 server with the generated AES key;
- Sends the encrypted message to the C2 server and receives a response from it;
- Decrypts the response with the same AES key used for encrypting the sent message.
The validator encrypts all the packets with the following ARM instructions:
|
1 2 3 4 5 |
E0 03 18 AA MOV X0, X24 2E 1A 00 94 BL serialize_plist A0 04 00 B4 CBZ X0, loc_100006CD4 E1 03 17 AA MOV X1, X23 39 1A 00 94 BL encryptData |
This code first executes the “serialized_plist” function, which prepares data for sending. After it is executed, the register X0 points to the data ready to be sent to the server.
The next function to be invoked is “encryptData”. It has two arguments: a pointer to the data being encrypted is passed to the X0 register, while the X1 register contains a plist with configuration data, including encryption parameters. After the execution of this function, the X0 register contains a pointer to the ciphertext.
Once again, we needed to compromise the encryption process to intercept the data from the infected device. We decided to replace the call to the “encryptData” function with a NOP instruction (1f 20 03 d5). This way, the value of the X0 register will not be overwritten with the pointer to the encrypted data, and the validator will send cleartext data to our VPN server.
Just as in the case with the JavaScript validator, we patched the code on the fly by extending our mitmproxy add-on:
|
1 2 3 4 |
sig_pattern = re.compile(rb"...\xaa...\xf9...\x94...\xaa...\x94...\xb4...\xaa...\x94...\xb4...\xb4...\x71...\x54...\xaa...\x70...\xd5...\xaa...\x14") block_to_nop = sig_pattern.findall(ungzipped)[0] new_block = block_to_nop[:28] + b'\x1f\x20\x03\xd5' + block_to_nop[32:] ungzipped = ungzipped.replace(block_to_nop, new_block) |
Snippet of the mitmproxy add-on code that patches the call to the encryptData function with a NOP
When the cleartext data reaches our VPN server, we (again, through the mitmproxy add-on) simulate a key exchange and data encryption and control the value of the encryption key. As a result, we successfully decrypted the data sent by the C2 server and extracted the body of the implant.
Obtaining the modules
After reverse engineering the TriangleDB implant, we found out that it is able to execute auxiliary modules, which made us want to obtain the module binaries. In our analysis of the implant, we wrote that module executables are passed to the implant through the CRXUpdateRecord and CRXUpdateRunRecord commands. Thus, in order to get these executables, it was necessary to be able to decrypt all the commands sent to the C2 server.
Again, the encryption algorithm was based on RSA, so our actions were similar to those we took to obtain the implant binaries.
This time, however, we decided to:
- Generate our own RSA public/private key pair;
- Replace the RSA public key from the implant’s configuration with the previously generated one.
We did that by adding the following code to the mitmproxy add-on:
|
1 2 3 4 5 6 7 |
macho_second_index = find_nth(decompressed_implant, b"\xcf\xfa\xed\xfe", 2) macho_second = decompressed_implant[macho_second_index:] rsa_key, xored_signature_offset, xor_key = extract_rsa_key(macho_second) my_der_key = MY_CERT_DER self.infections[flow.client_conn.peername[0]]["true_device_public_cert"] = rsa_key my_der_key_xored = xor_one_byte_key(my_der_key, xor_key) decompressed_implant[macho_second_index + xored_signature_offset:macho_second_index + xored_signature_offset+796] = my_der_key_xored |
When the implant traffic reached our VPN server, we:
- Decrypted it with the RSA private key that we generated;
- Saved the decrypted traffic;
- Re-encrypted the traffic with the public key used by the attackers.
This way, we were able to eavesdrop on all communications performed by the implant, as well as obtain the module binaries.
Conclusion
Our journey of investigating Operation Triangulation was quite lengthy; it took several months. Despite many ups and downs, we eventually managed to obtain all the stages used in this attack, including four zero-day exploits reported to Apple, two validators, an implant and its modules.
Along the way, we conducted a lot of research on iOS internals and came up with many interesting techniques, such as the one we used for extracting the iMessage attachment.
The main difficulty that we encountered during our research was to deal with the public-key cryptography that was used in just about every stage of the infection chain. To bypass the encryption, we had to develop a mitmproxy add-on that patched the malicious stages on the fly and compromised the original algorithms. Initially, we started with just 30 lines of code. When we finished extracting the modules, it had about 400 lines – and we definitely did not expect the add-on’s code to grow that much back at the start of our enduring adventure!
How to catch a wild triangle
From the same authors


In the same category


Denis
One of the best APT dissections ever published. If not the best.
Cheef
Super Analyse
John
Truly commendable work. One of the best reports ever.
Cheef
ITS very tricky
Scott
In the blogpost you highlight that you couldn’t decrypt messages to iMessage servers due to SSL pinning.
In that case how were you able to capture the initial exploit that allowed for backupagent to communicate further to download later stages?
Securelist
Hi Scott!
The process of obtaining the attachment is detailed in the “Exploring iMessage” section of this article. To put it short: the encrypted attachment data is not protected by SSL pinning, and we tricked iMessage into storing the decryption key on the device.
Jim
I have found “BackupAgent” log from timeline of my iPhone. But I can’t find malware from my iPhone. I have already jailbroken my iPhone. Maybe the exploit downloads the malware from C2 server and launch on device. Where does this malware exist on iPhone(the specific directory path)?
Securelist
Hi Jim,
The malware does not exist on the file system, as it runs completely in memory.
Jim
This vulnerability doesn’t have CVE number?
Securelist
Hi Jim,
Not sure, which vulnerability you speak of. We registered four zero-days related to this attack:
CVE-2023-32434, CVE-2023-3243, CVE-2023-38606, CVE-2023-41990