

Authors
We all encounter IoT and home automation in some form or another, from smart speakers to automated sensors that control water pumps. These services appear simple and straightforward to us, but many devices and protocols work together under the hood to deliver them.
One of those protocols is Zigbee. Zigbee is a low-power wireless protocol (based on IEEE 802.15.4) used by many smart devices to talk to each other. It’s common in homes, but is also used in industrial environments where hundreds or thousands of sensors may coordinate to support a process.
There are many guides online about performing security assessments of Zigbee. Most focus on the Zigbee you see in home setups. They often skip the Zigbee used at industrial sites, what I call ‘non-public’ or ‘industrial’ Zigbee.
In this blog, I will take you on a journey through Zigbee assessments. I’ll explain the basics of the protocol and map the attack surface likely to be found in deployments. I’ll also walk you through two realistic attack vectors that you might see in facilities, covering the technical details and common problems that show up in assessments. Finally, I will present practical ways to address these problems.
Zigbee introduction
Protocol overview
Zigbee is a wireless communication protocol designed for low-power applications in wireless sensor networks. Based on the IEEE 802.15.4 standard, it was created for short-range and low-power communication. Zigbee supports mesh networking, meaning devices can connect through each other to extend the network range. It operates on the 2.4 GHz frequency band and is widely used in smart homes, industrial automation, energy monitoring, and many other applications.
You may be wondering why there’s a need for Zigbee when Wi-Fi is everywhere? The answer depends on the application. In most home setups, Wi-Fi works well for connecting devices. But imagine you have a battery-powered sensor that isn’t connected to your home’s electricity. If it used Wi-Fi, its battery would drain quickly – maybe in just a few days – because Wi-Fi consumes much more power. In contrast, the Zigbee protocol allows for months or even years of uninterrupted work.
Now imagine an even more extreme case. You need to place sensors in a radiation zone where humans can’t go. You drop the sensors from a helicopter and they need to operate for months without a battery replacement. In this situation, power consumption becomes the top priority. Wi-Fi wouldn’t work, but Zigbee is built exactly for this kind of scenario.
Also, Zigbee has a big advantage if the area is very large, covering thousands of square meters and requiring thousands of sensors: it supports thousands of nodes in a mesh network, while Wi-Fi is usually limited to hundreds at most.
There are lots more ins and outs, but these are the main reasons Zigbee is preferred for large-scale, low-power sensor networks.
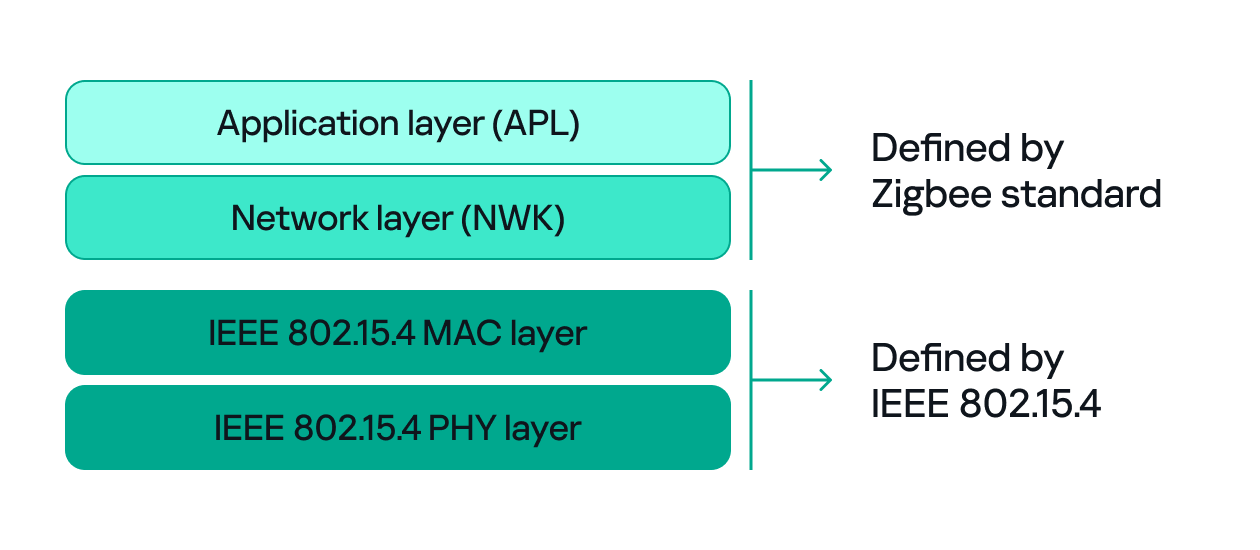
Since both Zigbee and IEEE 802.15.4 define wireless communication, many people confuse the two. The difference between them, to put it simply, concerns the layers they support. IEEE 802.15.4 defines the physical (PHY) and media access control (MAC) layers, which basically determine how devices send and receive data over the air. Zigbee (as well as other protocols like Thread, WirelessHART, 6LoWPAN, and MiWi) builds on IEEE 802.15.4 by adding the network and application layers that define how devices form a network and communicate.
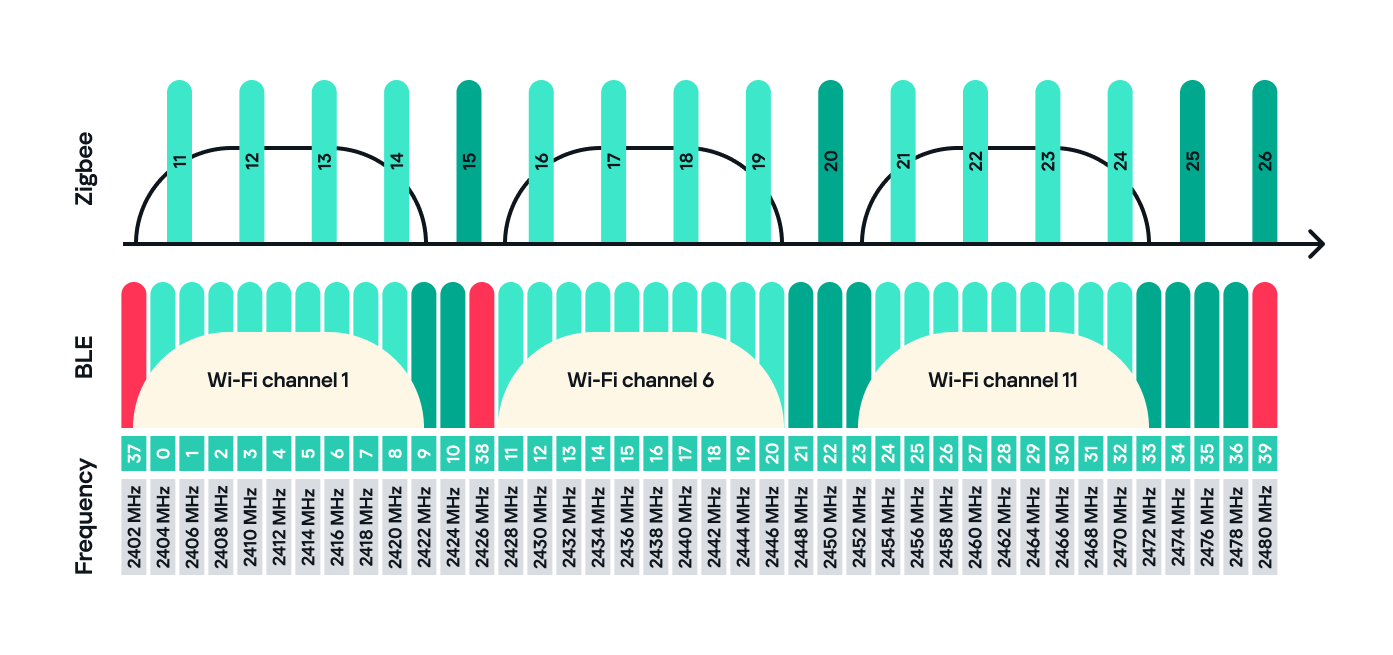
Zigbee operates in the 2.4 GHz wireless band, which it shares with Wi-Fi and Bluetooth. The Zigbee band includes 16 channels, each with a 2 MHz bandwidth and a 5 MHz gap between channels.
This shared frequency means Zigbee networks can sometimes face interference from Wi-Fi or Bluetooth devices. However, Zigbee’s low power and adaptive channel selection help minimize these conflicts.
Devices and network
There are three main types of Zigbee devices, each of which plays a different role in the network.
- Zigbee coordinator
The coordinator is the brain of the Zigbee network. A Zigbee network is always started by a coordinator and can only contain one coordinator, which has the fixed address 0x0000.
It performs several key tasks:- Starts and manages the Zigbee network.
- Chooses the Zigbee channel.
- Assigns addresses to other devices.
- Stores network information.
- Chooses the PAN ID: a 2-byte identifier (for example, 0x1234) that uniquely identifies the network.
- Sets the Extended PAN ID: an 8-byte value, often an ASCII name representing the network.
The coordinator can have child devices, which can be either Zigbee routers or Zigbee end devices.
- Zigbee router
The router works just like a router in a traditional network: it forwards data between devices, extends the network range and can also accept child devices, which are usually Zigbee end devices.
Routers are crucial for building large mesh networks because they enable communication between distant nodes by passing data through multiple hops. - Zigbee end device
The end device, also referred to as a Zigbee endpoint, is the simplest and most power-efficient type of Zigbee device. It only communicates with its parent, either a coordinator or router, and sleeps most of the time to conserve power. Common examples include sensors, remotes, and buttons.
Zigbee end devices do not accept child devices unless they are configured as both a router and an endpoint simultaneously.
Each of these device types, also known as Zigbee nodes, has two types of address:
- Short address: two bytes long, similar to an IP address in a TCP/IP network.
- Extended address: eight bytes long, similar to a MAC address.
Both addresses can be used in the MAC and network layers, unlike in TCP/IP, where the MAC address is used only in Layer 2 and the IP address in Layer 3.
Zigbee setup
Zigbee has many attack surfaces, such as protocol fuzzing and low-level radio attacks. In this post, however, I’ll focus on application-level attacks. Our test setup uses two attack vectors and is intentionally small to make the concepts clear.
In our setup, a Zigbee coordinator is connected to a single device that functions as both a Zigbee endpoint and a router. The coordinator also has other interfaces (Ethernet, Bluetooth, Wi-Fi, LTE), while the endpoint has a relay attached that the coordinator can switch on or off over Zigbee. This relay can be triggered by events coming from any interface, for example, a Bluetooth command or an Ethernet message.

Our goal will be to take control of the relay and toggle its state (turn it off and on) using only the Zigbee interface. Because the other interfaces (Ethernet, Bluetooth, Wi-Fi, LTE) are out of scope, the attack must work by hijacking Zigbee communication.
For the purposes of this research, we will attempt to hijack the communication between the endpoint and the coordinator. The two attack vectors we will test are:
- Spoofed packet injection: sending forged Zigbee commands made to look like they come from the coordinator to trigger the relay.
- Coordinator impersonation (rejoin attack): impersonating the legitimate coordinator to trick the endpoint into joining the attacker-controlled coordinator and controlling it directly.
Spoofed packet injection
In this scenario, we assume the Zigbee network is already up and running and that both the coordinator and endpoint nodes are working normally. The coordinator has additional interfaces, such as Ethernet, and the system uses those interfaces to trigger the relay. For instance, a command comes in over Ethernet and the coordinator sends a Zigbee command to the endpoint to toggle the relay. Our goal is to toggle the relay by injecting simulated legitimate Zigbee packets, using only the Zigbee link.
Sniffing
The first step in any radio assessment is to sniff the wireless traffic so we can learn how the devices talk. For Zigbee, a common and simple tool is the nRF52840 USB dongle by Nordic Semiconductor. With the official nRF Sniffer for 802.15.4 firmware, the dongle can run in promiscuous mode to capture all 802.15.4/Zigbee traffic. Those captures can be opened in Wireshark with the appropriate dissector to inspect the frames.
How do you find the channel that’s in use?
Zigbee runs on one of the 16 channels that we mentioned earlier, so we must set the sniffer to the same channel that the network uses. One practical way to scan the channels is to change the sniffer channel manually in Wireshark and watch for Zigbee traffic. When we see traffic, we know we’ve found the right channel.
After selecting the channel, we will be able to see the communication between the endpoint and the coordinator, though it will most likely be encrypted:
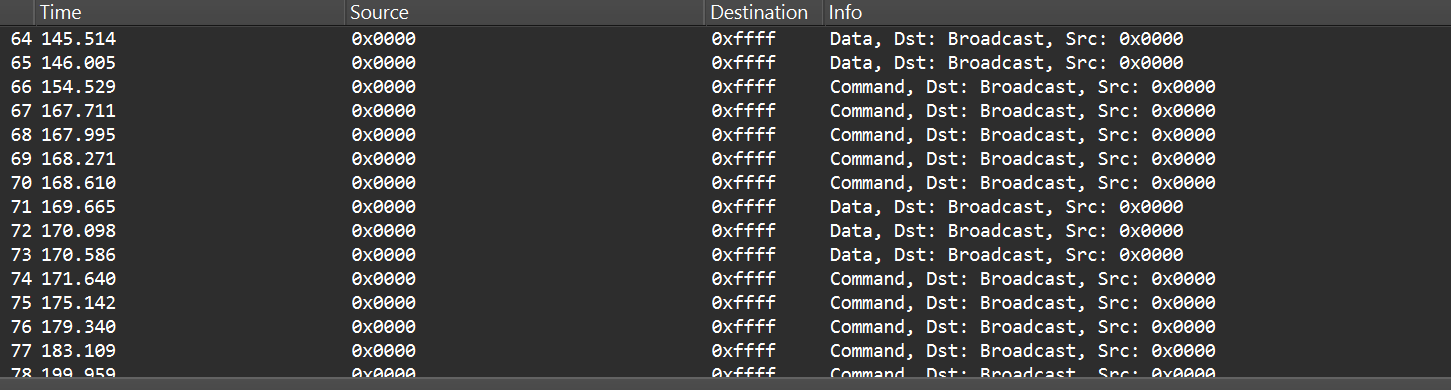
In the “Info” column, we can see that Wireshark only identifies packets as Data or Command without specifying their exact type, and that’s because the traffic is encrypted.
Even when Zigbee payloads are encrypted, the network and MAC headers remain visible. That means we can usually read things like source and destination addresses, PAN ID, short and extended MAC addresses, and frame control fields. The application payload (i.e., the actual command to toggle the relay) is typically encrypted at the Zigbee network/application layer, so we won’t see it in clear text without encryption keys. Nevertheless, we can still learn enough from the headers.
Decryption
Zigbee supports several key types and encryption models. In this post, we’ll keep it simple and look at a case involving only two security-related devices: a Zigbee coordinator and a device that is both an endpoint and a router. That way, we’ll only use a network encryption model, whereas with, say, mesh networks there can be various encryption models in use.
The network encryption model is a common concept. The traffic that we sniffed earlier is typically encrypted using the network key. This key is a symmetric AES-128 key shared by all devices in a Zigbee network. It protects network-layer packets (hop-by-hop) such as routing and broadcast packets. Because every router on the path shares the network key, this encryption method is not considered end-to-end.
Depending on the specific implementation, Zigbee can use two approaches for application payloads:
- Network-layer encryption (hop-by-hop): the network key encrypts the Application Support Sublayer (APS) data, the sublayer of the application layer in Zigbee. In this case, each router along the route can decrypt the APS payload. This is not end-to-end encryption, so it is not recommended for transmitting sensitive data.
- Link key (end-to-end) encryption: a link key, which is also an AES-128 key, is shared between two devices (for example, the coordinator and an endpoint).
The link key provides end-to-end protection of the APS payload between the two devices.
Because the network key could allow an attacker to read and forge many types of network traffic, it must be random and protected. Exposing the key effectively compromises the entire network.
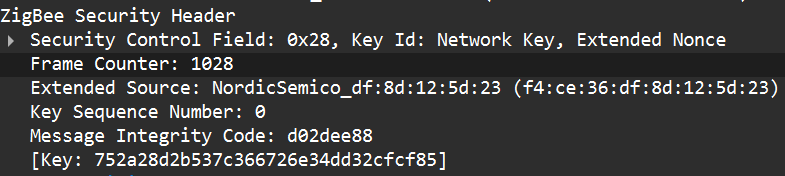
When a new device joins, the coordinator (Trust Center) delivers the network key using a Transport Key command. That transport packet must be protected by a link key so the network key is not exposed in clear text. The link key authenticates the joining device and protects the key delivery.
The image below shows the transport packet:

There are two common ways link keys are provided:
- Pre-installed: the device ships with an installation code or link key already set.
- Key establishment: the device runs a key-establishment protocol.
A common historical problem is the global default Trust Center link key, “ZigBeeAlliance09”. It was included in early versions of Zigbee (pre-3.0) to facilitate testing and interoperability. However, many vendors left it enabled on consumer devices, and that has caused major security issues. If an attacker knows this key, they can join devices and read or steal the network key.
Newer versions – Zigbee 3.0 and later – introduced installation codes and procedures to derive unique link keys for each device. An installation code is usually a factory-assigned secret (often encoded on the device label) that the Trust Center uses to derive a unique link key for the device in question. This helps avoid the problems caused by a single hard-coded global key.
Unfortunately, many manufacturers still ignore these best practices. During real assessments, we often encounter devices that use default or hard-coded keys.
How can these keys be obtained?
If an endpoint has already joined the network and communicates with the coordinator using the network key, there are two main options for decrypting traffic:
- Guess or brute-force the network key. This is usually impractical because a properly generated network key is a random AES-128 key.
- Force the device to rejoin and capture the transport key. If we can make the endpoint leave the network and then rejoin, the coordinator will send the transport key. Capturing that packet can reveal the network key, but the transport key itself is protected by the link key. Therefore, we still need the link key.
To obtain the network and link keys, many approaches can be used:
- The well-known default link key, ZigBeeAlliance09. Many legacy devices still use it.
- Identify the device manufacturer and search for the default keys used by that vendor. We can find the manufacturer by:
- Checking the device MAC/OUI (the first three bytes of the 64-bit extended address often map to a vendor).
- Physically inspecting the device (label, model, chip markings).
- Extract the firmware from the coordinator or device if we have physical access and search for hard-coded keys inside the firmware images.
Once we have the relevant keys, the decryption process is straightforward:
- Open the capture in Wireshark.
- Go to Edit -> Preferences -> Protocols -> Zigbee.
- Add the network key and any link keys in our possession.
- Wireshark will then show decrypted APS payloads and higher-level Zigbee packets.
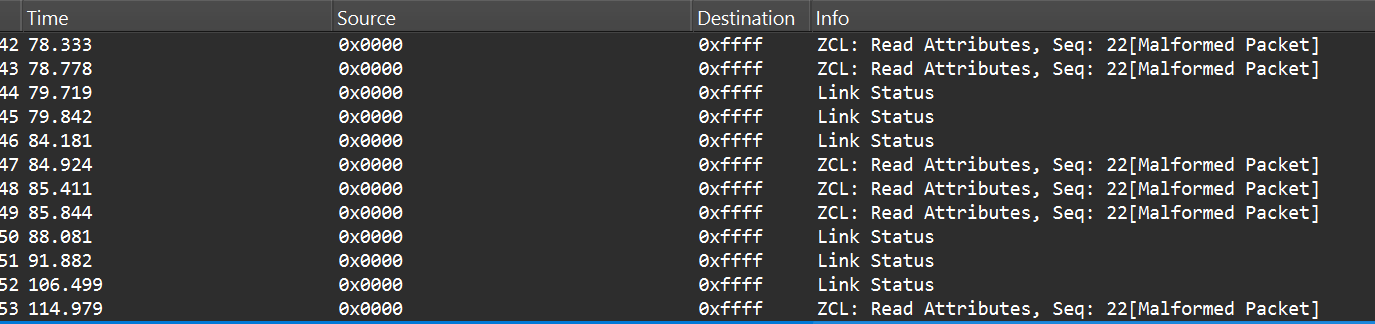
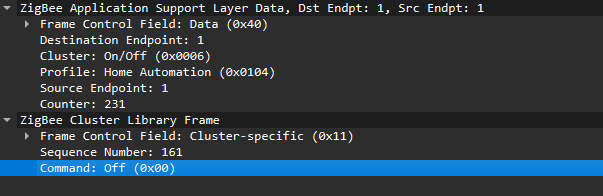
After successful decryption, packet types and readable application commands will be visible, such as Link Status or on/off cluster commands:
Choose your gadget
Now that we can read and potentially decrypt traffic, we need hardware and software to inject packets over the Zigbee link between the coordinator and the endpoint. To keep this practical and simple, I opted for cheap, widely available tools that are easy to set up.
For the hardware, I used the nRF52840 USB dongle, the same device we used for sniffing. It’s inexpensive, easy to find, and supports IEEE 802.15.4/Zigbee, so it can sniff and transmit.
The dongle runs the firmware we can use. A good firmware platform is Zephyr RTOS. Zephyr has an IEEE 802.15.4 radio API that enables the device to receive raw frames, essentially enabling sniffer mode, as well as send raw frames as seen in the snippets below.
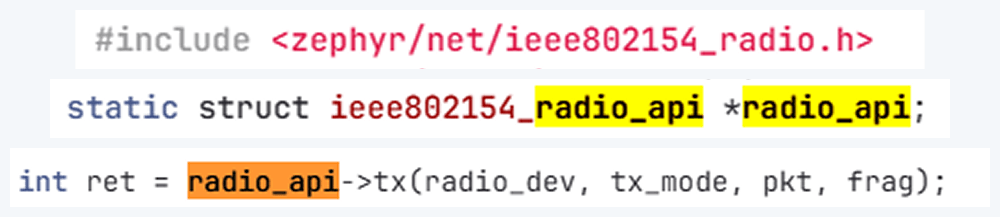
Using this API and other components, we created a transceiver implementation written in C, compiled it to firmware, and flashed it to the dongle. The firmware can expose a simple runtime interface, such as a USB serial port, which allows us to control the radio from a laptop.
At runtime, the dongle listens on the serial port (for example, /dev/ttyACM1). Using a script, we can send it raw bytes, which the firmware will pass to the radio API and transmit to the channel. The following is an example of a tiny Python script to open the serial port:
![]()
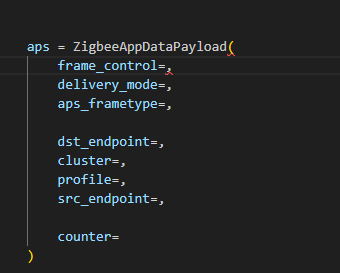
I used the Scapy tool with the 802.15.4/Zigbee extensions to build Zigbee packets. Scapy lets us assemble packets layer-by-layer – MAC → NWK → APS → ZCL – and then convert them to raw bytes to send to the dongle. We will talk about APS and ZCL in more detail later.
Here is an example of how we can use Scapy to craft an APS layer packet:
|
1 2 |
from scapy.layers.dot15d4 import Dot15d4, Dot15d4FCS, Dot15d4Data, Dot15d4Cmd, Dot15d4Beacon, Dot15d4CmdAssocResp from scapy.layers.zigbee import ZigbeeNWK, ZigbeeAppDataPayload, ZigbeeSecurityHeader, ZigBeeBeacon, ZigbeeAppCommandPayload |
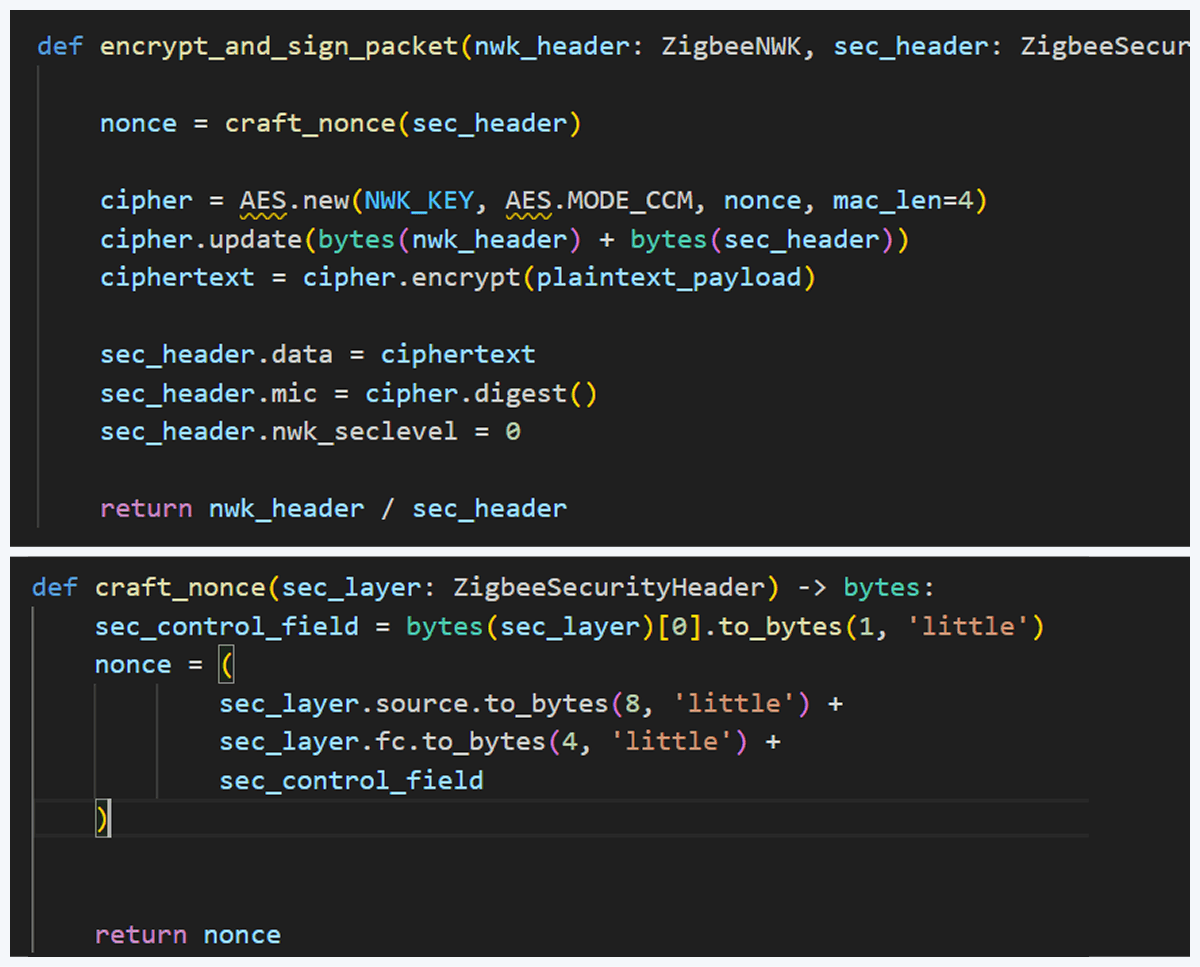
Before sending, the packet must be properly encrypted and signed so the endpoint accepts it. That means applying AES-CCM (AES-128 with MIC) using the network key (or the correct link key) and adhering to Zigbee’s rules for packet encryption and MIC calculation. This is how we implemented the encryption and MIC in Python (using a cryptographic library) after building the Scapy packet. We then sent the final bytes to the dongle.
This is how we implemented the encryption and MIC:
Crafting the packet
Now that we know how to inject packets, the next question is what to inject. To toggle the relay, we simply need to send the same type of command that the coordinator already sends. The easiest way to find that command is to sniff the traffic and read the application payload. However, when we look at captures in Wireshark, we can see many packets under ZCL marked [Malformed Packet].
A “malformed” ZCL packet usually means Wireshark could not fully interpret the packet because the application layer is non-standard or lacks details Wireshark expects. To understand why this happens, let’s look at the Zigbee application layer.
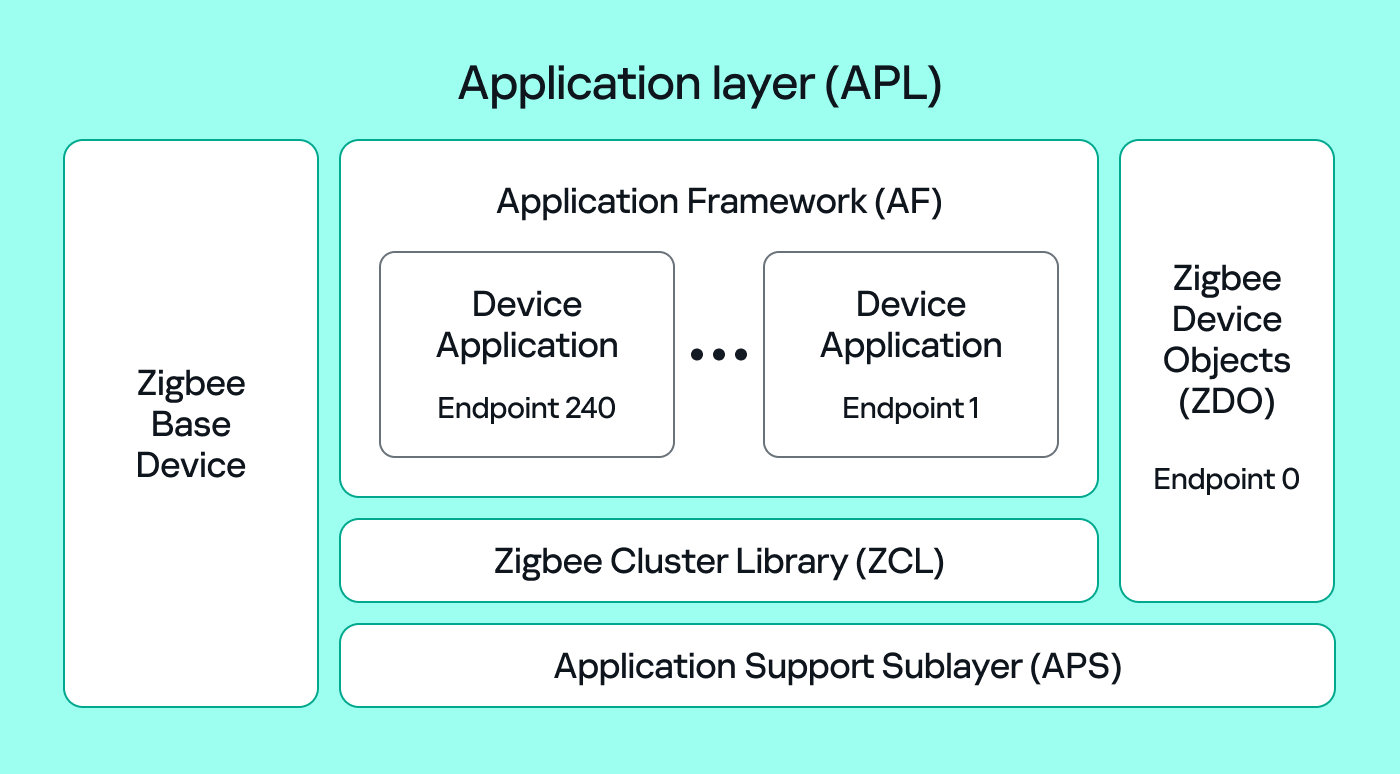
The Zigbee application layer consists of four parts:
- Application Support Sublayer (APS): routes messages to the correct profile, endpoint, and cluster, and provides application-level security.
- Application Framework (AF): contains the application objects that implement device functionality. These objects reside on endpoints (logical addresses 1–240) and expose clusters (sets of attributes and commands).
- Zigbee Cluster Library (ZCL): defines standard clusters and commands so devices can interoperate.
- Zigbee Device Object (ZDO): handles device discovery and management (out of scope for this post).
To make sense of application traffic, we must introduce three concepts:
- Profile: a rulebook for how devices should behave for a specific use case. Public (standard) profiles are managed by the Connectivity Standards Alliance (CSA). Vendors can also create private profiles for proprietary features.
- Cluster: a set of attributes and commands for a particular function. For example, the On/Off cluster contains On and Off commands and an OnOff attribute that displays the current state.
- Endpoint: a logical “port” on the device where a profile and clusters reside. A device can host multiple endpoints for different functions.
Putting all this together, in the standard home automation traffic we see APS pointing to the home automation profile, the On/Off cluster, and a destination endpoint (for example, endpoint 1). In ZCL, the byte 0x00 often means “Off”.
In many industrial setups, vendors use private profiles or custom application frameworks. That’s why Wireshark can’t decode the packets; the AF payload is custom, so the dissector doesn’t know the format.
So how do we find the right bytes to toggle the switch when the application is private? Our strategy has two phases.
- Passive phase
Sniff traffic while the system is driven legitimately. For example, trigger the relay from another interface (Ethernet or Bluetooth) and capture the Zigbee packets used to toggle the relay. If we can decrypt the captures, we can extract the application payload that correlates with the on/off action.

- Active phase
With the legitimate payload at hand, we can now turn to creating our own packet. There are two ways to do that. First, we need to replay or duplicate the captured application payload exactly as it is. This works if there are no freshness checks like sequence numbers. Otherwise, we have to reverse-engineer the payload and adjust any counters or fields that prevent replay. For instance, many applications include an application-level counter. If the device ignores packets with a lower application counter, we must locate and increment that counter when we craft our packet.
Another important protective measure is the frame counter inside the Zigbee security header (in the network header security fields). The frame counter prevents replay attacks; the receiver expects the frame counter to increase with each new packet, and will reject packets with a lower or repeated counter.
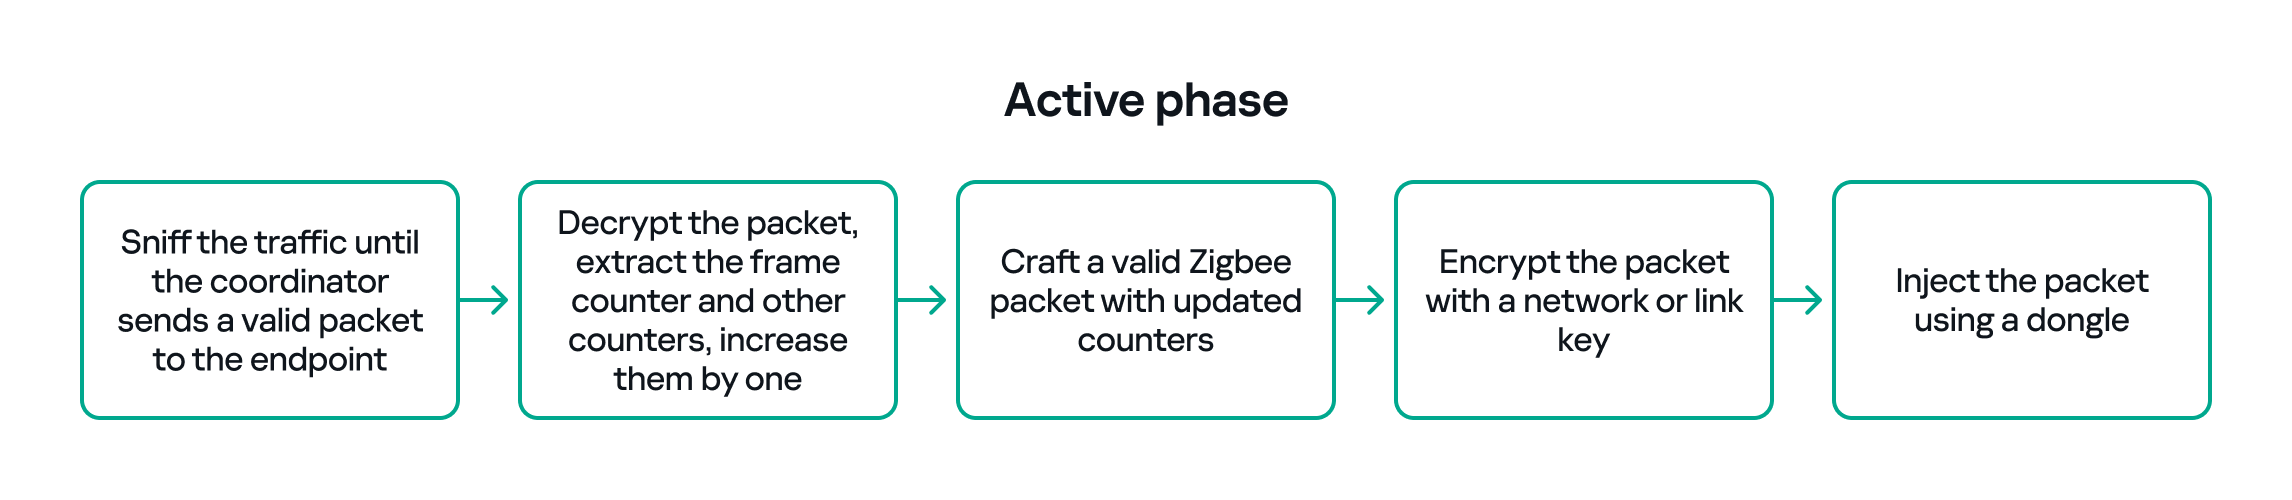
So, in the active phase, we must:
- Sniff the traffic until the coordinator sends a valid packet to the endpoint.
- Decrypt the packet, extract the counters and increase them by one.
- Build a packet with the correct APS/AF fields (profile, endpoint, cluster).
- Include a valid ZCL command or the vendor-specific payload that we identified in the passive phase.
- Encrypt and sign the packet with the correct network or link key.
- Make sure both the application counter (if used) and the Zigbee frame counter are modified so the packet is accepted.
The whole strategy for this phase will look like this:
If all of the above are handled correctly, we will be able to hijack the Zigbee communication and toggle the relay (turn it off and on) using only the Zigbee link.
Coordinator impersonation (rejoin attack)
The goal of this attack vector is to force the Zigbee endpoint to leave its original coordinator’s network and join our spoofed network so that we can take control of the device. To do this, we must achieve two things:
- Force the endpoint to leave the original network.
- Spoof the original coordinator and trick the node into joining our fake coordinator.
Force leaving
To better understand how to manipulate endpoint connections, let’s first describe the concept of a beacon frame. Beacon frames are periodic announcements sent by a coordinator and by routers. They advertise the presence of a network and provide join information, such as:
- PAN ID and Extended PAN ID
- Coordinator address
- Stack/profile information
- Device capacity (for example, whether the coordinator can accept child devices)
When a device wants to join, it sends a beacon request across Zigbee channels and waits for beacon replies from nearby coordinators/routers. Even if the network is not beacon-enabled for regular synchronization, beacon frames are still used during the join/discovery process, so they are mandatory when a node tries to discover networks.
Note that beacon frames exist at both the Zigbee and IEEE 802.15.4 levels. The MAC layer carries the basic beacon structure that Zigbee then extends with network-specific fields.

Now, we can force the endpoint to leave its network by abusing how Zigbee handles PAN conflicts. If a coordinator sees beacons from another coordinator using the same PAN ID and the same channel, it may trigger a PAN ID conflict resolution. When that happens, the coordinator can instruct its nodes to change PAN ID and rejoin, which causes them to leave and then attempt to join again. That rejoin window gives us an opportunity to advertise a spoofed coordinator and capture the joining node.
In the capture shown below, packet 7 is a beacon generated by our spoofed coordinator using the same PAN ID as the real network. As a result, the endpoint with the address 0xe8fa leaves the network (see packets 14–16).

Choose me
After forcing the endpoint to leave its original network by sending a fake beacon, the next step is to make the endpoint choose our spoofed coordinator. At this point, we assume we already have the necessary keys (network and link keys) and understand how the application behaves.
To impersonate the original coordinator, our spoofed coordinator must reply to any beacon request the endpoint sends. The beacon response must include the same Extended PAN ID (and other fields) that the endpoint expects. If the endpoint deems our beacon acceptable, it may attempt to join us.
I can think of two ways to make the endpoint prefer our coordinator.
- Jam the real coordinator
Use a device that reduces the real coordinator’s signal at the endpoint so that it appears weaker, forcing the endpoint to prefer our beacon. This requires extra hardware. - Exploit undefined or vendor-specific behavior
Zigbee stacks sometimes behave slightly differently across vendors. One useful field in a beacon is the Update ID field. It increments when a coordinator changes network configuration.
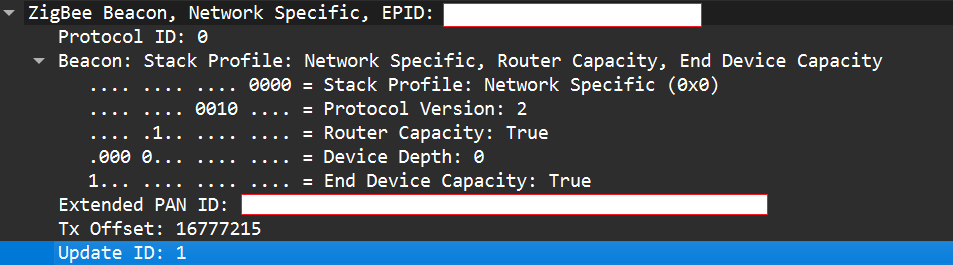
If two coordinators advertise the same Extended PAN ID but one has a higher Update ID, some stacks will prefer the beacon with the higher Update ID. This is undefined behavior across implementations; it works on some stacks but not on others. In my experience, sometimes it works and sometimes it fails. There are lots of other similar quirks we can try during an assessment.
Even if the endpoint chooses our fake coordinator, the connection may be unstable. One main reason for that is the timing. The endpoint expects ACKs for the frames it sends to the coordinator, as well as fast responses regarding connection initiation packets. If our responder is implemented in Python on a laptop that receives packets, builds responses, and forwards them to a dongle, the round trip will be too slow. The endpoint will not receive timely ACKs or packets and will drop the connection.
In short, we’re not just faking a few packets; we’re trying to reimplement parts of Zigbee and IEEE 802.15.4 that must run quickly and reliably. This is usually too slow for production stacks when done in high-level, interpreted code.
A practical fix is to run a real Zigbee coordinator stack directly on the dongle. For example, the nRF52840 dongle can act as a coordinator if flashed with the right Nordic SDK firmware (see Nordic’s network coordinator sample). That provides the correct timing and ACK behavior needed for a stable connection.
However, that simple solution has one significant disadvantage. In industrial deployments we often run into incompatibilities. In my tests I compared beacons from the real coordinator and the Nordic coordinator firmware. Notable differences were visible in stack profile headers:
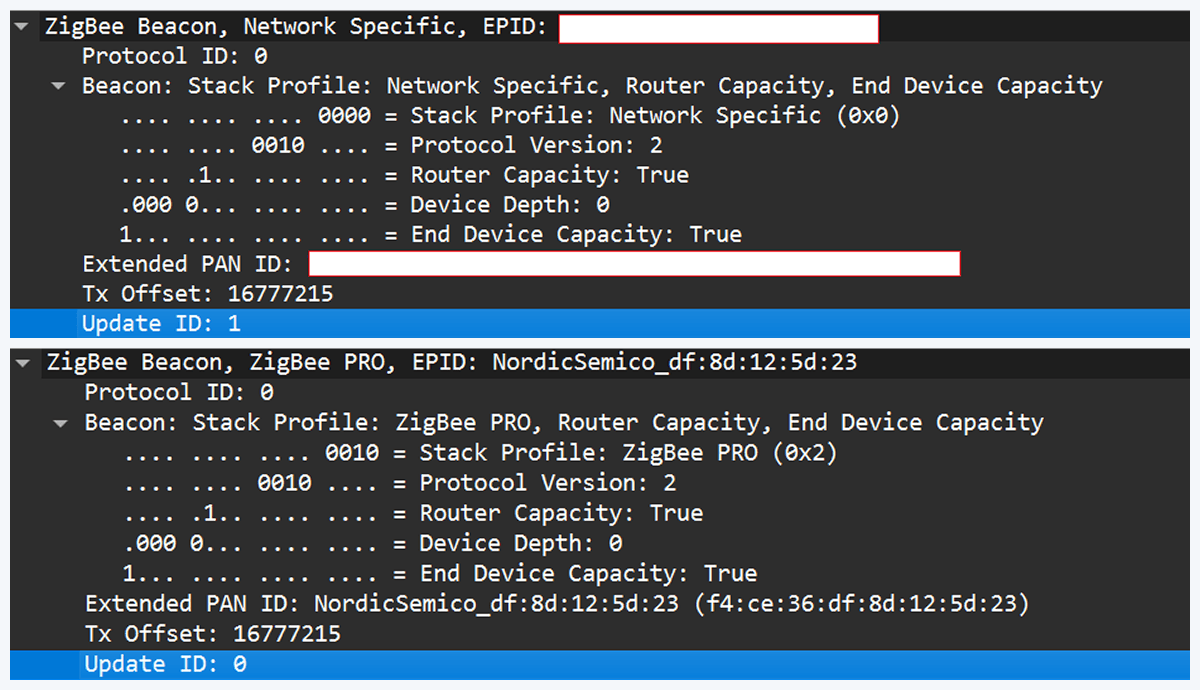
The stack profile identifies the network profile type. Common values include 0x00, which is a network-specific (private) profile, and 0x02, which is a Zigbee Pro (public) profile.
If the endpoint expects a network-specific profile (i.e., it uses a private vendor profile) and we provide Zigbee Pro, the endpoint will refuse to join. Devices that only understand private profiles will not join public-profile networks, and vice versa. In my case, I could not change the Nordic firmware to match the proprietary stack profile, so the endpoint refused to join.
Because of this discrepancy, the “flash a coordinator firmware on the dongle” fix was ineffective in that environment. This is why the standard off-the-shelf tools and firmware often fail in industrial cases, forcing us to continue working with and optimizing our custom setup instead.
Back to the roots
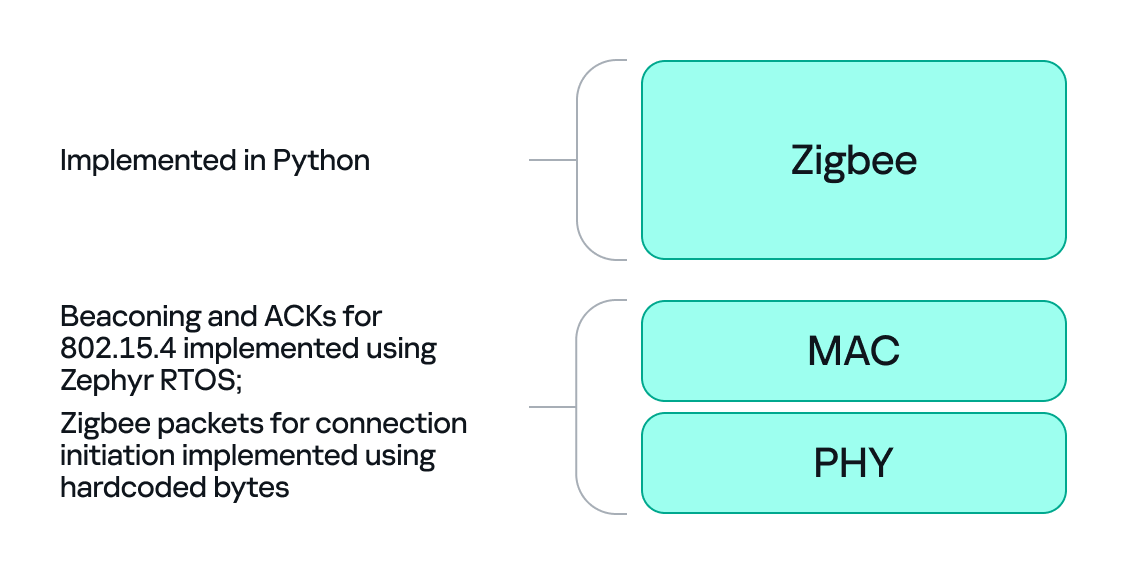
In our previous test setup we used a sniffer in promiscuous mode, which receives every frame on the air regardless of destination. Real Zigbee (IEEE 802.15.4) nodes do not work like that. At the MAC/802.15.4 layer, a node filters frames by PAN ID and destination address. A frame is only passed to upper layers if the PAN ID matches and the destination address is the node’s address or a broadcast address.
We can mimic that real behavior on the dongle by running Zephyr RTOS and making the dongle act as a basic 802.15.4 coordinator. In that role, we set a PAN ID and short network address on the dongle so that the radio only accepts frames that match those criteria. This is important because it allows the dongle to handle auto-ACKs and MAC-level timing: the dongle will immediately send ACKs at the MAC level.
With the dongle doing MAC-level work (sending ACKs and PAN filtering), we can implement the Zigbee logic in Python. Scapy helps a lot with packet construction: we can create our own beacons with the headers matching those of the original coordinator, which solves the incompatibility problem. However, we must still implement the higher-level Zigbee state machine in our code, including connection initiation, association, network key handling, APS/AF behavior, and application payload handling. That’s the hardest part.
There is one timing problem that we cannot solve in Python: the very first steps of initiating a connection require immediate packet responses. To handle this issue, we implemented the time-critical parts in C on the dongle firmware. For example, we can statically generate the packets for connection initiation in Python and hard-code them in the firmware. Then, using “if” statements, we can determine how to respond to each packet from the endpoint.
So, we let the dongle (C/Zephyr) handle MAC-level ACKs and the initial association handshake, but let Python build higher-level packets and instruct the dongle what to send next when dealing with the application level. This hybrid model reduces latency and maintains a stable connection. The final architecture looks like this:
Deliver the key
Here’s a quick recap of how joining works: a Zigbee endpoint broadcasts beacon requests across channels, waits for beacon responses, chooses a coordinator, and sends an association request, followed by a data request to identify its short address. The coordinator then sends a transport key packet containing the network key. If the endpoint has the correct link key, it can decrypt the transport key packet and obtain the network key, meaning it has now been authenticated. From that point on, network traffic is encrypted with the network key. The entire process looks like this:

The sticking point is the transport key packet. This packet is protected using the link key, a per-device key shared between the coordinator (Trust Center) and the joining endpoint. Before the link key can be used for encryption, it often needs to be processed (hashed/derived) according to Zigbee’s key derivation rules. Since there is no trivial Python implementation that implements this hashing algorithm, we may need to implement the algorithm ourselves.
I implemented the required key derivation; the code is available on our GitHub.
Now that we’ve managed to obtain the hashed link key and deliver it to the endpoint, we can successfully mimic a coordinator.
The final success
If we follow the steps above, we can get the endpoint to join our spoofed coordinator. Once the endpoint joins, it will often remain associated with our coordinator, even after we power it down (until another event causes it to re-evaluate its connection). From that point on, we can interact with the device at the application layer using Python. Getting access as a coordinator allowed us to switch the relay on and off as intended, but also provided much more functionality and control over the node.
Conclusion
In conclusion, this study demonstrates why private vendor profiles in industrial environments complicate assessments: common tools and frameworks often fail, necessitating the development of custom tools and firmware. We tested a simple two-node scenario, but with multiple nodes the attack surface changes drastically and new attack vectors emerge (for example, attacks against routing protocols).
As we saw, a misconfigured Zigbee setup can lead to a complete network compromise. To improve Zigbee security, use the latest specification’s security features, such as using installation codes to derive unique link keys for each device. Also, avoid using hard-coded or default keys. Finally, it is not recommended to use the network key encryption model. Add another layer of security in addition to the network level protection by using end-to-end encryption at the application level.
From the same authors


In the same category


Turn me on, turn me off: Zigbee assessment in industrial environments