

Authors
Biometric scanners offer a unique way to resolve the conflict between security and usability. They help to identify a person by their unique biological characteristics – a fairly reliable process that does not require the user to exert any extra effort. Yet, biometric scanners, as any other tech, have their weaknesses. This article touches on biometric scanner security from the red team’s perspective and uses the example of a popular hybrid terminal model to demonstrate approaches to scanner analysis. These approaches are admittedly fairly well known and applied to analysis of any type of device.
We also talk about the benefits of biometric scanners for access control systems and their role in ensuring a due standard of security given today’s realities. Furthermore, we discuss vulnerabilities in a biometric scanner from a major global vendor that we found while analyzing its level of security. The article will prove useful for both security researchers and architects.
We have notified the vendor about all the vulnerabilities and security issues we found. A CVE entry has been registered for each of the vulnerability types: CVE-2023-3938, CVE-2023-3939, CVE-2023-3940, CVE-2023-3941, CVE-2023-3942, CVE-2023-3943.
A brief overview of biometric terminals
In a security context, biometric terminals are used for personal identification. They rely on the analysis of unique human physical characteristics, such as fingerprints, voice, facial features, or the iris.
Importantly, though, a biometric terminal is somewhat different from a regular scanner. First, it can both acquire biometric data and validate it. Second, terminals can be connected to other scanners, such as electronic pass readers, or support other authentication methods using built-in hardware.
Their main purpose is to control access to an area or site. As such, they can be used for restricting access to premises that house confidential data, such as a server room or executive office, or to control access to hazardous facilities, such as a nuclear power or chemical plant.
Another application is recording employees’ work hours to improve productivity and reduce the likelihood of successful fraud.
In terms of security, biometric terminals can be said to offer the following benefits:
- Highly accurate identification: biometric data is unique to each human being, which makes it a reliable way of identity verification.
- Secure: biometric data is difficult to forge or copy, which increases system security.
- User-friendly: biometric identification does not require subjects to remember passwords or carry access cards.
- Efficiency: biometric terminals can process large amounts of data fast to reduce wait times.
These devices are not without their downsides, though.
- Cost: biometric terminals are typically more expensive than traditional access control systems.
- Risk of error: although biometric data is unique, in some cases, systems have misidentified individuals who had damaged fingertips, etc.
- Privacy: some may have concerns about their biometric data being stored and used without their consent.
- Technological limitations: some biometric identification methods (such as face recognition) can be less efficient under low light conditions, when the subject is wearing a mask, etc.
Biometric terminals are quite an intriguing target for a pentester. Vulnerabilities in these devices, positioned at the nexus of the physical and network perimeters, pose risks that can be considered when analyzing the security of both these perimeters.
Some of the goals that can be achieved in terms of offensive security are:
- Authentication bypass and physical access violation
- Biometric data leak
- Gaining network access to a device and exploiting that to further develop the attack
Now that we have defined the biometric terminal, its applications, benefits and downsides, and security analysis objectives associated with it, we can move on to analyzing a specific device.
A brief overview of the device in question.
The device under review is a hybrid biometric terminal made by ZKTeco. It may come under various names depending on the distributor. You can see its external appearance in the photograph below.

External appearance of the device
The device has several physical interfaces, supporting four authentication methods: biometric (facial recognition), password, electronic pass, and QR code.
The following physical interfaces are present:
- RJ45;
- RS232;
- RS485 (unused);
- Wiegand In/Out.
A regular (non-privileged) user has few options in terms of interacting with the device: they can only tap one of the two on-screen buttons that you can see in the photograph below.

Available touchscreen buttons
Tapping a button brings up a prompt for PIN, which is the user’s unique ID in our case.
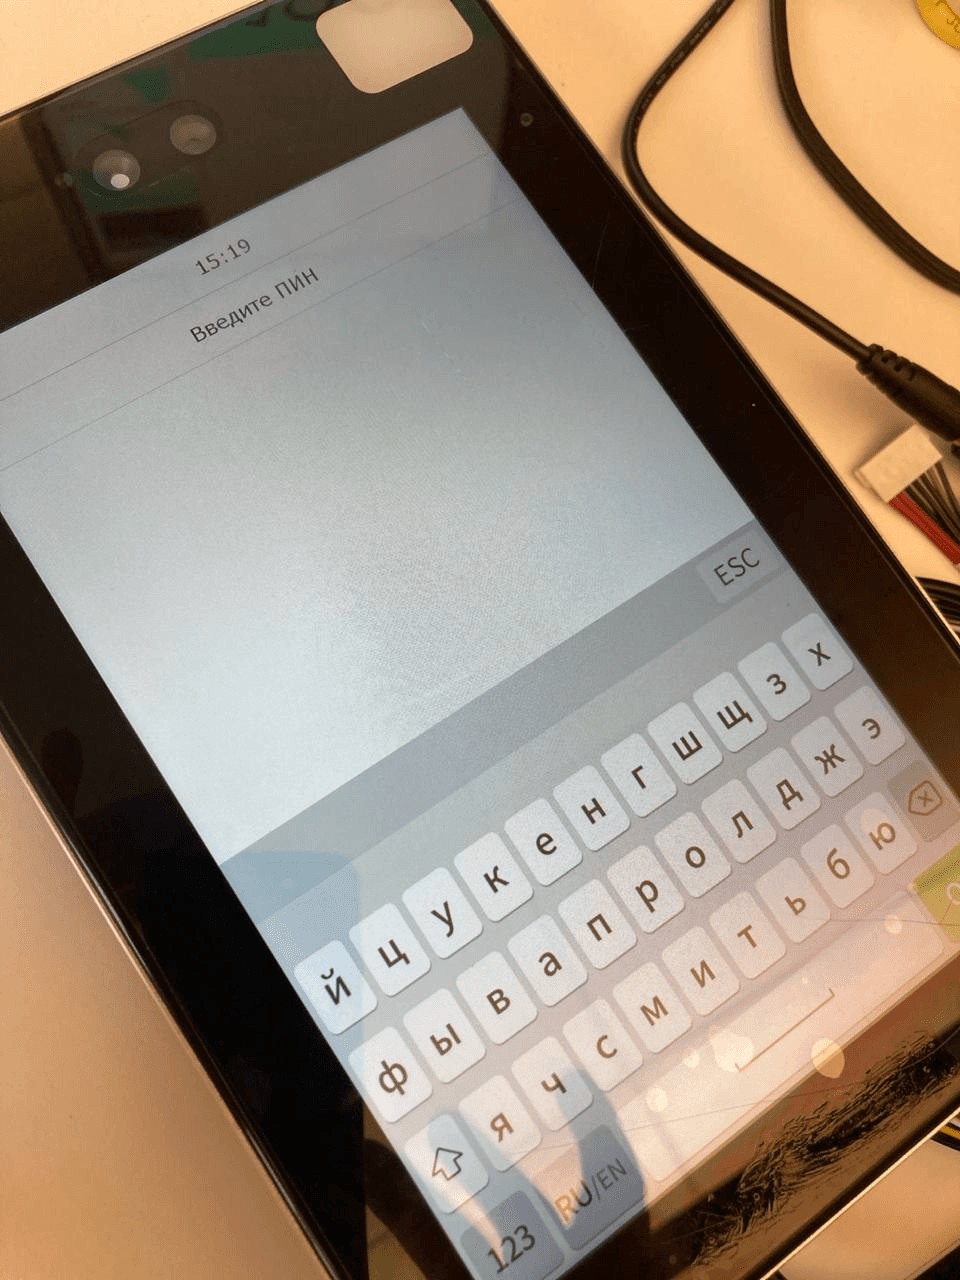
User ID input interface
If a valid (existing) ID is entered, the screen displays available user-specific authentication options. The example shows a user with the ID 1 and two authentication methods: biometrics and password.
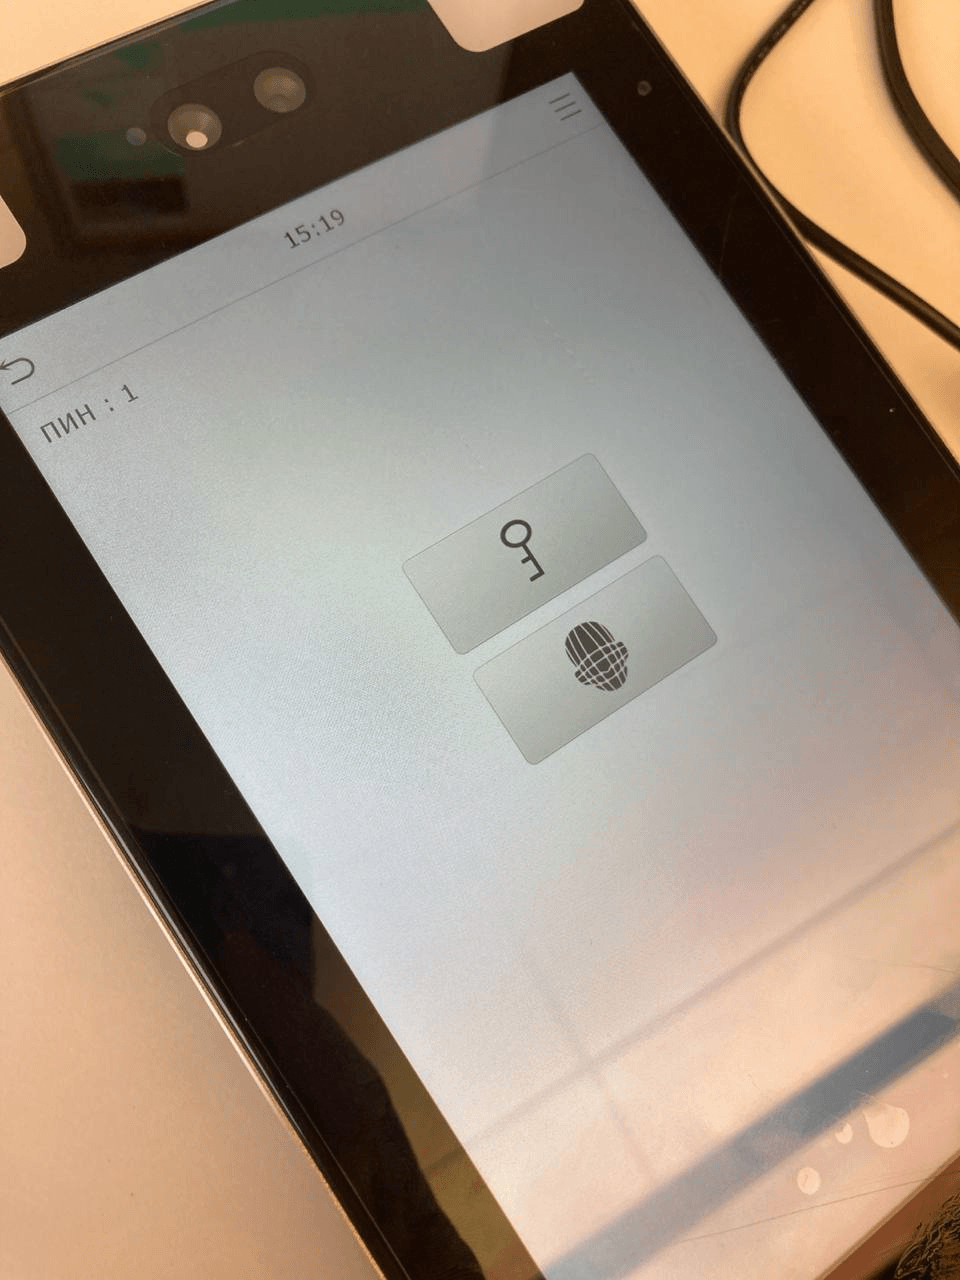
Authentication methods available to the user with the ID 1
That is the extent of what a non-administrator or unauthenticated user can do with the terminal.
The options available to an administrator are more interesting. With administrator privileges, we can control nearly all of the device settings. The image below shows the maximum-access menu.
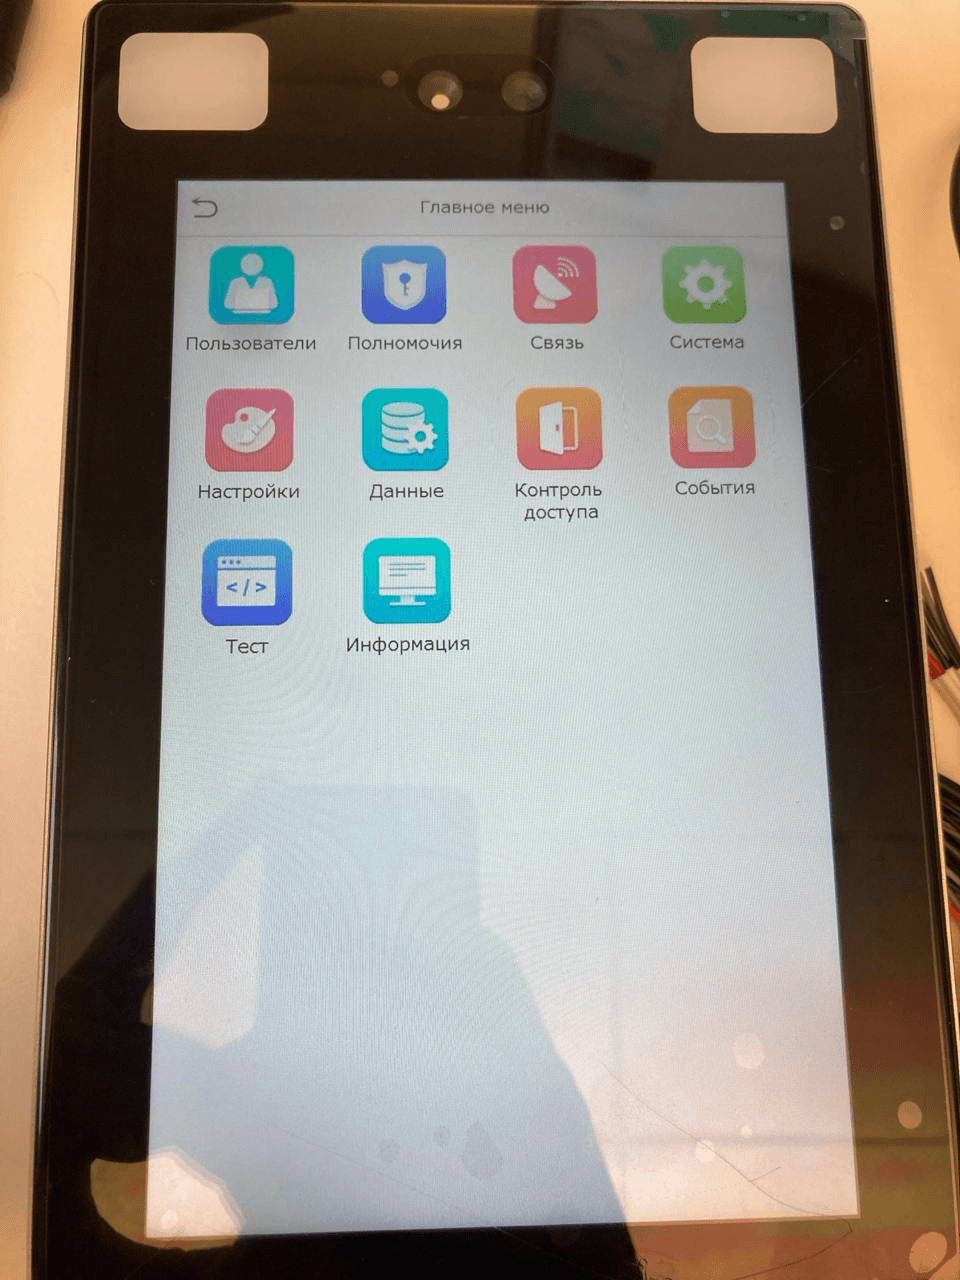
Administrator’s device setup menu
The administrator menu can be used to add new users, manage their levels of access, and change the network and facial scanner settings. As you will see below, administrator access allows for achieving all of the security analysis objectives listed in the previous section. Getting that level of access requires passing authentication as an administrator.
Black box analysis
Circuit analysis
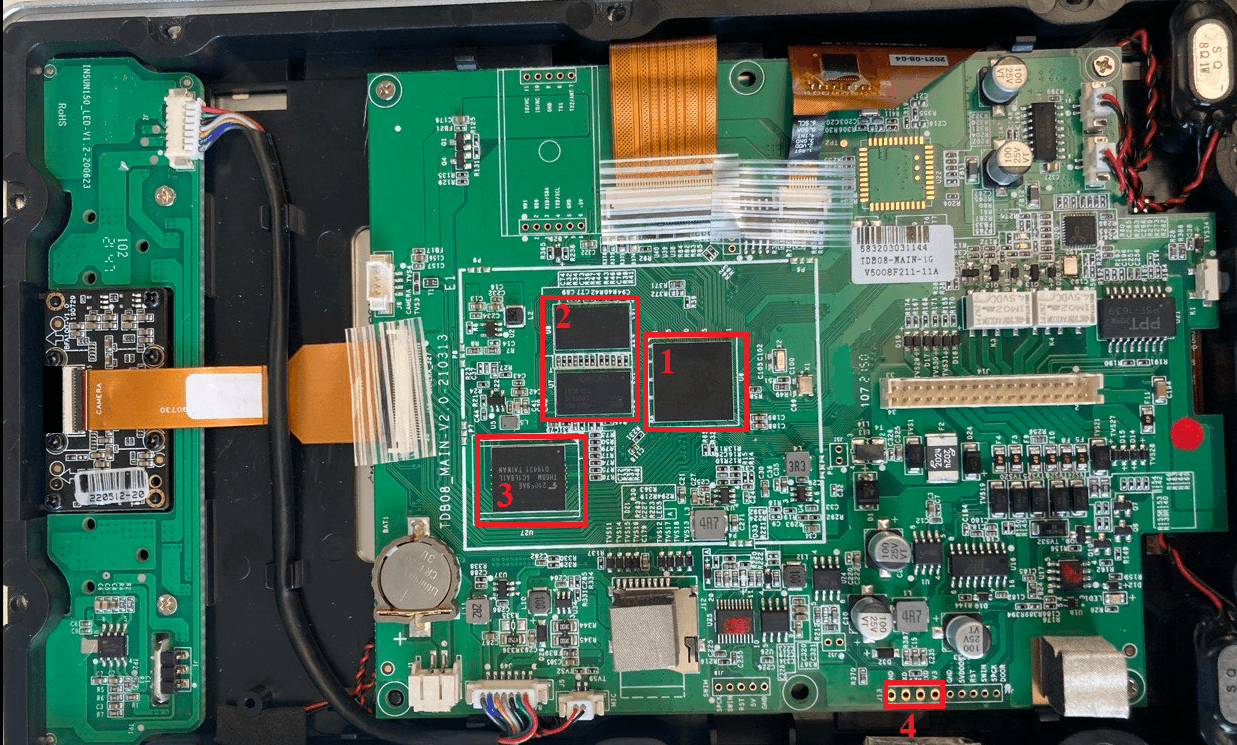
Our engineering analysis will begin with black box analysis, and namely, circuit analysis. The photograph below shows the circuit board with the following components that we are interested in.
- SOC (HI 3516 DV300);
- RAM (K4B4G16E-BCMA, 4Gb);
- Flash memory (THGBMJG6C1LBAI, 8Gb, BGA-153);
- UART.
Circuit board
You may notice that the circuit board has many test points. That said, we are only interested in the ones marked with the number 4, as those are the location of a universal asynchronous receiver-transmitter (UART) that we can use to communicate with the device. The flash memory, marked with the number 3, is of interest as well, as it holds the entire firmware in unencrypted form.
To check that we had recognized the UART correctly, we used an oscilloscope to connect to what we had identified as the TX port through which the device sends data externally.

Oscilloscope connection to UART
After calculating the UART data rate and setting the oscilloscope to that value, we saw that this was indeed a UART, and the device was sending a boot log through it.

Boot log
Next, we connected to the UART using a PC, which helped us to view the full boot log and identify the bootloader as U-Boot.

UART connection from a PC
The bootloader configuration prevents any attempts at interrupting startup (bootdelay = -2) or interacting with it in any other way. However, having waited some time after the device booted up, we found that the UART switched to a different baud (bits per second) rate of 115,200 from 57,600 as the device began to send uniform packets, which suggested the use of an unknown protocol.
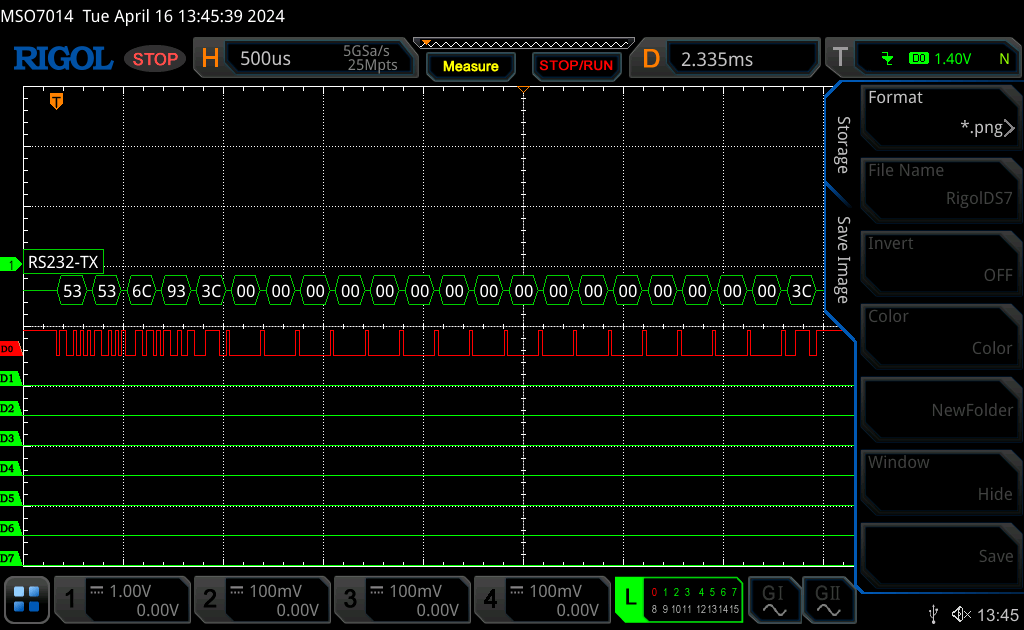
The unknown protocol as used by the UART
Every packet began with a 0x53 0x53 byte, and the fifth byte was always identical to the final one. An online search for these two brought up nothing. Sending similarly formatted packets to the device yielded nothing, either.
Network analysis
Another type of black box analysis is scanning network ports. We can use Nmap, a publicly available network scanner utility, to see which ports are open, and try to identify the services running on these and their versions. The screenshot below shows the TCP ports open on the biometric terminal.
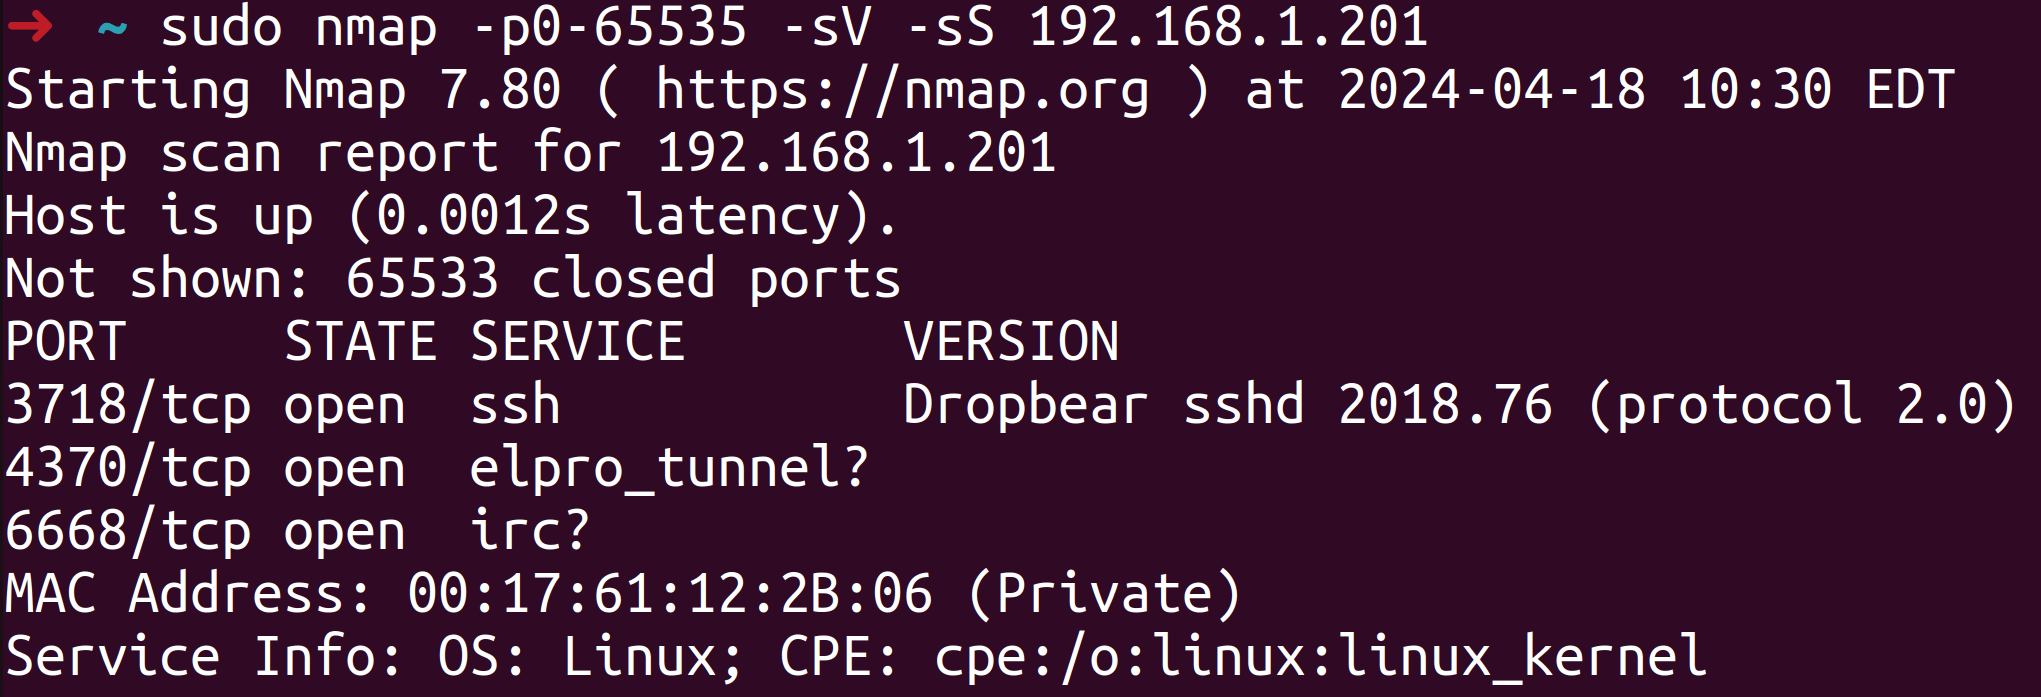
Open ports
You may notice that the device supports SSH on a non-standard port. In theory, we could connect to that if we get hold of the right credentials. We could potentially extract those from the firmware by using a dictionary attack or brute-forcing the password hash.
Besides, there were two services that could not be identified automatically. The service running on port 6668/TCP was Tuya Server, but we could not find out its purpose. The service running on port 4370/TCP was more interesting as it used the vendor’s proprietary protocol supported by many of its devices. After searching the web for the protocol, we found that there was documentation available, making our analysis much easier.

Searching for the protocol on port 4370/TCP
Camera and QR code scanner analysis
Our overview of the device mentions that it supports QR code authentication. We decided to see what happened if a code we presented to the device contained invalid data that could disrupt the processing logic. We were able to achieve a result by making the device scan a QR code that contained malicious SQL code.
A basic SQL injection resulted in the device recognizing us as a valid user.
Gaining access with the help of an SQL injection
We further noticed that making the device scan a QR code containing 1 KB of data or more caused it to go into an emergency reboot, which suggested that some of its components had experienced overflow. More on this in the reverse engineering and firmware analysis section.
Getting and unpacking the firmware
The vendor’s website will not let just anyone download the latest version of the firmware. You can download a PDF file containing the update algorithm, but it is protected with a password that we could not find on any public websites.
Therefore, we had two options for obtaining the firmware: removing the flash memory and dumping it with a programmer, or trying to find a copy on the web.
Searching the web for the firmware
To start searching for the firmware, we needed to find out its name and rough version. We were analyzing an unused device fresh out of the box, so we had administrator access to it. Therefore, we could view the device details and find the current firmware version.
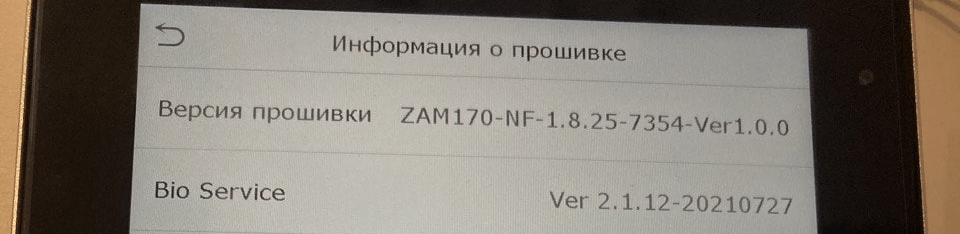
Firmware details as seen in the setup menu
The version we had was ZAM170-NF-1.8.25-7354-Ver1.0.0. We used that string and parts of it for our web search.
After running some sophisticated Google search queries, we found a few devices on international distributors’ websites that looked a lot like our terminal.

A similar device on an international distributor’s website
We also found the firmware, albeit it was an earlier version.

Same-series firmware
The firmware was just enough for us to figure out how the update worked. Having downloaded and analyzed the firmware, we found that the update itself was part of a text file to be transformed by specialized software.
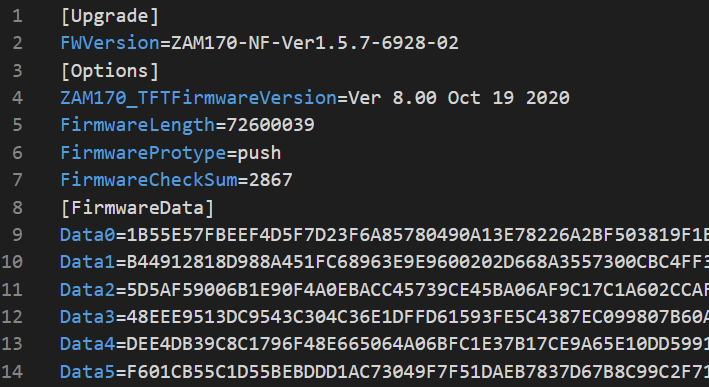
Update text file
The transformation process was not too sophisticated, with the hexadecimal text records contained in the “DataX” variables converted to the byte format to produce firmware.
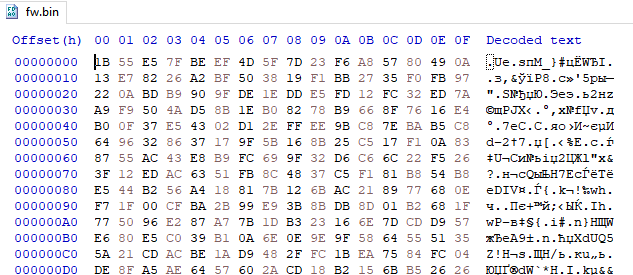
Update binary
A quick analysis of the file found that it was encrypted. This led us to examine other files in the archive.
A closer inspection revealed that the device supported partial firmware updates that affected only certain libraries and executables. We found a smaller update package like that inside a directory shipped with the firmware archive that we had downloaded from the distributor website.

Partial update archive

Partial update files
Through a quick analysis of the “standalonecomm” executable, we found that the file handled requests received on port 4370/TCP. The executable also had firmware update functionality. The handler invoked a “zkfp_ExtractPackage” file extractor function that was external to the executable.

Update file extract code

External update image extract function
We failed to find the function in any of the other update files, so we resorted to searching the web. This took us to a repository that had the function in its header file.

Searching for the extract function
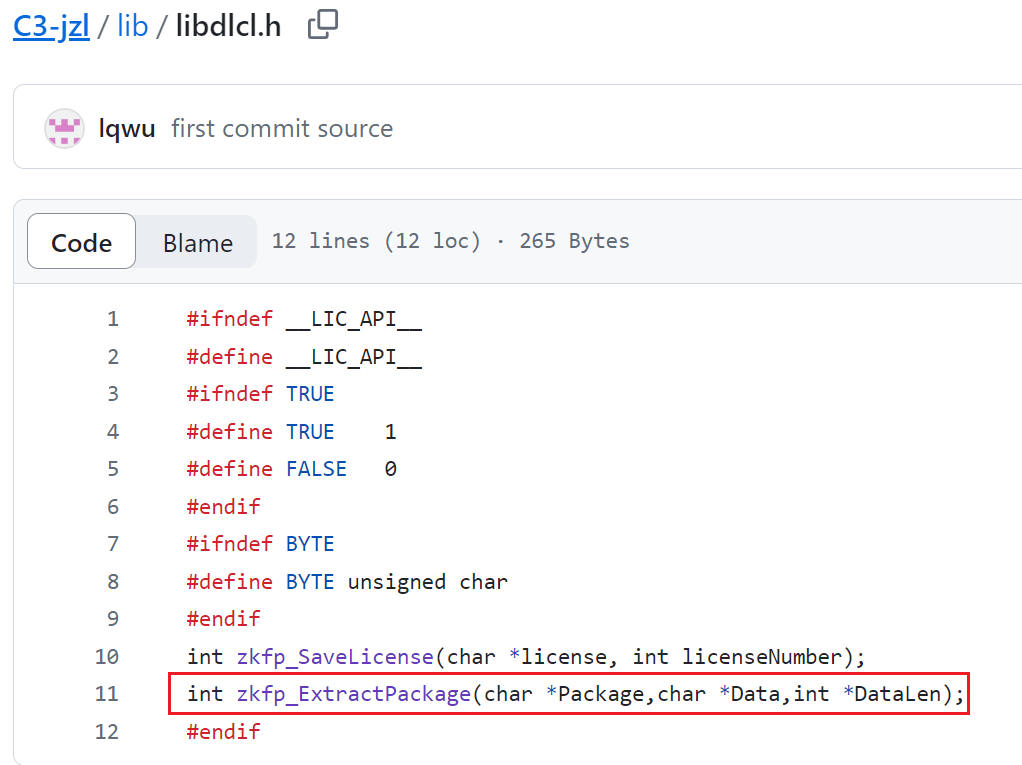
The extract function inside the header file
We found a library with the function implemented inside the same repository.

The library with the extract function inside the repository

Searching for the extract function inside the library
After analyzing the extract function, we found that it was also used for decrypting the firmware. The screenshot below shows the decrypt code.

Update file decrypt code
The encryption used XOR with a key consisting of the last 16 bytes of the update file and the file size. It appeared that now we had all the data we needed to generate a key and decrypt the firmware.
Once decrypted, the file turned out to contain an update only for some of the executables, libraries and configuration files.
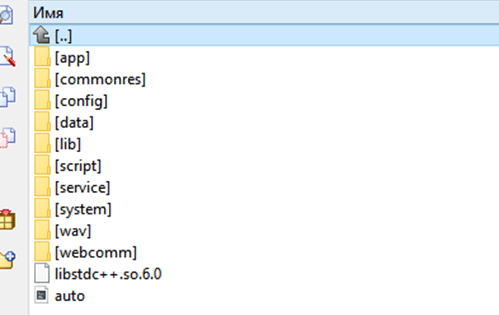
Decrypted update archive
This was not too much of an issue, as the executable that handled incoming data on port 4370/TCP – the one we were looking for – was among the contents of the downloaded archive. We still wanted the full firmware, so we tried the other option: reading the flash memory.
Getting the firmware from the flash memory
As mentioned at the beginning of this section, one could pull a copy of the firmware from the flash memory located on the circuit board.

The flash memory on the circuit board
The memory was an eMMC inside a BGA-153 package that was easy to find a programmer clip for, online. Reading the flash memory gave us a file that contained various sections as shown below.
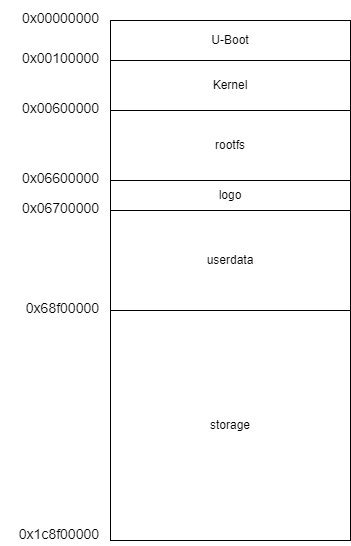
Flash memory structure
The section names were generally self-explanatory, but we still ran binwalk, a publicly available utility for data container analysis, to make sure they were correct. The binwalk output is shown below.
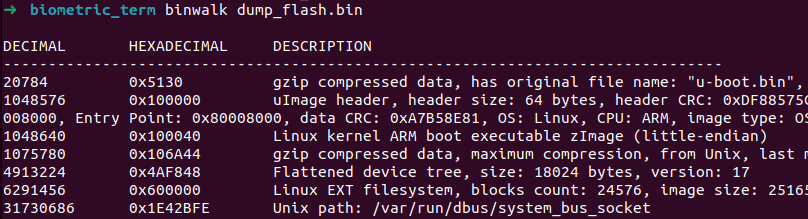
The binwalk output for the flash memory dump
Besides all the executables and a Linux kernel, the flash memory contained the credentials of the system’s only two users.

The contents of /etc/shadow
Assuming the users accessed the device via SSH, we tried brute-forcing the hashes to get their passwords. We successfully obtained the password for the user “zkteco” who indeed had SSH access to the terminal.
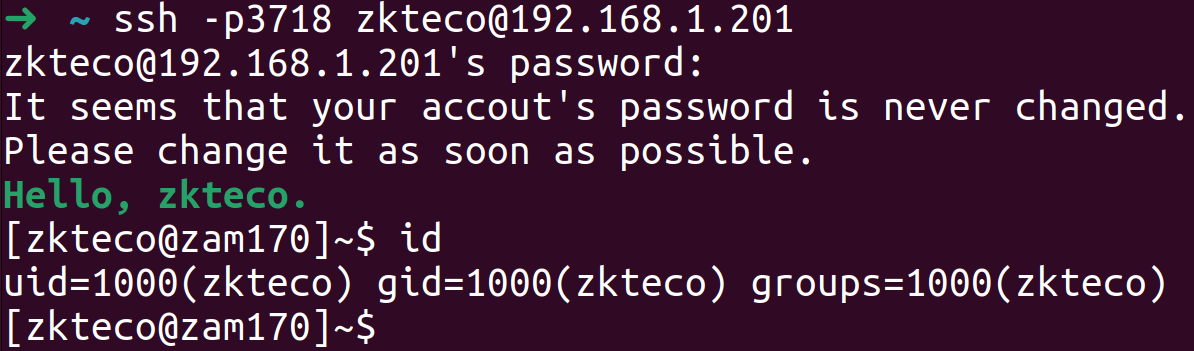
Logging in with credentials via SSH
Unfortunately, this user did not have the highest privileges, but we still got access to a number of sensitive system files and a list of running services.

Executables running on the device
The main service is named “main”. It controls everything that is displayed on the screen and talks to other necessary services through a service named “hub”. The latter is a message broker of sorts that provides a convenient interface for services to communicate. A further service of interest is “pushcomm”: an HTTP client that sends requests to a server specified in the device configuration. In other words, the client can be used to attack the device if the attacker can make the device talk to a web server that they control. Read on to find out about attacks that can be implemented by using this method. Also, note that all the services are running with the highest privileges, which makes hijacking the device much easier as any vulnerability that allows code or command execution gives the attacker the highest privileges.
Analyzing the protocol on port 4370/TCP
We chose the standalonecomm service as the main object for our analysis as it implements the vendor’s proprietary protocol on port 4370/TCP and contains commands of interest to an attacker that may be implemented improperly.
As mentioned at the beginning of this article, protocol documentation is available from a GitHub repository, which significantly simplifies analysis as one can apply the knowledge to disassembled code to find the handler of the command one is interested in.
The protocol structure is fairly simple and typical. A packet consists of a header and a payload. The payload is also divided into a header and data, with the latter largely determined by the command. In some cases, it is a four-byte number, and in others, a string or dataset. A detailed description of the protocol design can be found in the publicly available document repository.
Protocol authentication and its issues
The protocol’s interesting features include user authentication, which requires knowing the password set on the device. On our device, the password is called “COMKey” and set by the administrator. The password is set to 0 by default, that is, there is no password, and all requests can be run without any authentication.
Besides, COMKey can be an integer from 0 to 999999, so there is a limited number of possible passwords that can be brute-forced over the network. We came across the restriction while analyzing the code that sets the password.

COMKey set code
The method used for generating a so-called “MAC” (Message Authentication Code) for protocol authentication is not secure enough either. The generation process relies on reversible operations, so if we can monitor traffic on the network, we can recover the password once the client is authenticated successfully. The generation code is shown in the screenshot below.
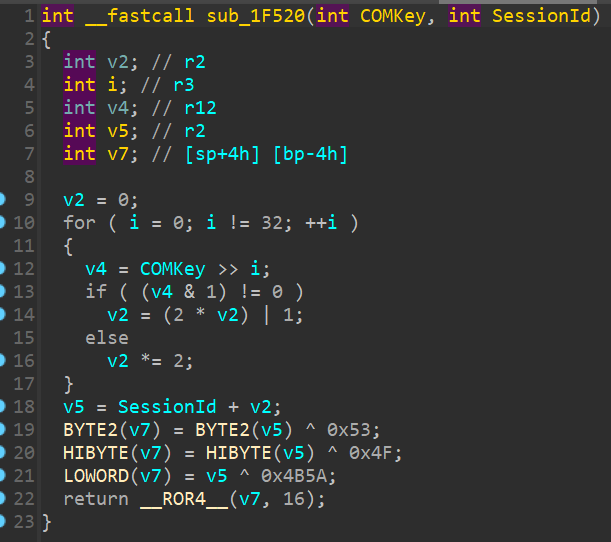
MAC generation code
The SessionId variable is a two-byte value generated by the server and sent to the client, so it can calculate a MAC from the COMKey and return the resulting value to the server.
Another password-related security risk is that the COMKey is stored unencrypted in the device database, so an arbitrary file read vulnerability would let us find it out and authenticate over the protocol. Another possible scenario is logging in via SSH and reading the database to obtain the protocol password without a network brute-force attack.
The diagram below illustrates the protocol authentication mechanism.

Protocol authentication mechanism
The client sends a connect command (CMD_CONNECT), and the server returns two bytes that represent a SessionId and are combined with the COMKey to generate a MAC. The client sends the MAC with a CMD_AUTH command, and the server validates that. If the MAC is found to be valid, the server responds with CMD_ACK_OK, and the client is now free to use all available server commands within the current TCP session.
Vulnerability analysis of command handlers
All commands that become available as a result of successful authentication are handled by one large function with a command ID switcher inside. Below is what its graphic representation looks like.

A graphic representation of the command handler
Analyzing the function does not involve any great complexity: this is only a matter of time and attention.
We immediately singled out commands whose names contained the words “DOWNLOAD”, “UPLOAD”, “DELETE” or “UPDATE” as relevant analysis objects.
For example, CMD_DOWNLOAD_PICTURE downloads a user image. It accepts a file name as an argument, which it does not validate in any way before inserting in the file open function. This allows passing, say, directory traversal characters as a file name to fetch an arbitrary system file. The handler code is shown in the screenshot below.
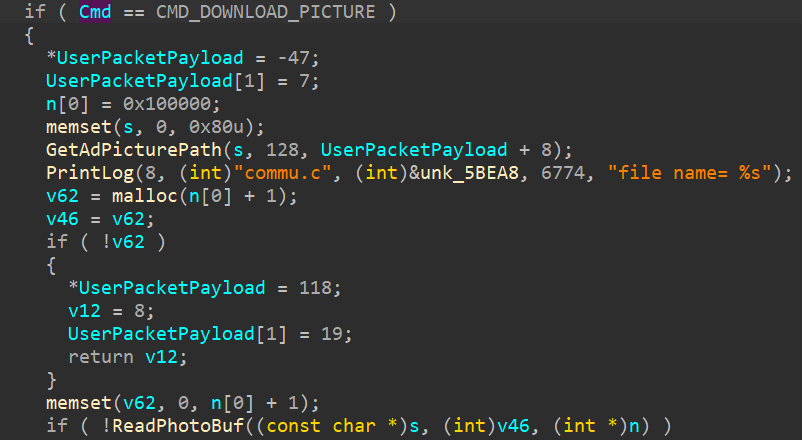
Image download handler
The command can be used to obtain /etc/shadow, as standalonecomm is running with the highest privileges.
We detected several file read vulnerabilities after finding further commands that passed file names without any filtering. We also found a function that allowed uploading files to arbitrary paths. Given the privileges granted to the service, the function can be leveraged to gain unlimited access to the device.
An analysis of CMD_DELETE_PICTURE revealed the possibility of embedding shell commands due to the name of the image to be deleted being inserted directly into the command, which was then passed to the “system” function.
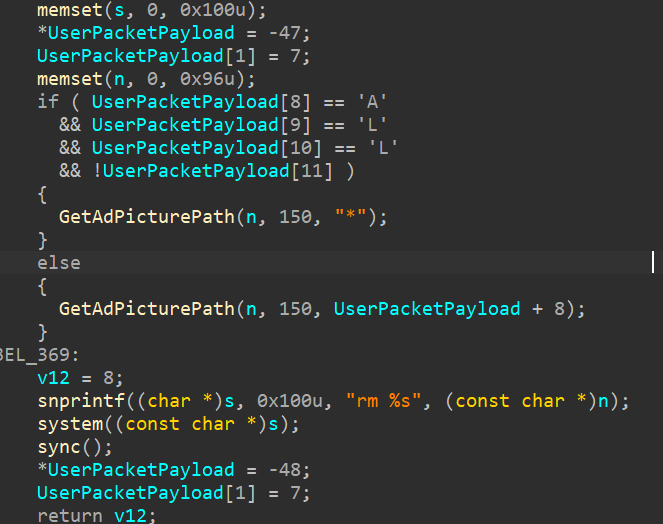
Image delete handler
We wrote PoC scripts to confirm that the vulnerability can be exploited. See below for script output.

PoC script output
We also found several buffer overflow vulnerabilities associated with the use of insecure strcpy/sprintf functions and a lack of copied buffer size validation in the “memcpy” function. We will use the example of the CMD_CHECKUDISKUPDATEPACKPAGE handler to examine the issue.

CMD_CHECKUDISKUPDATEPACKPAGE handler
The vulnerability stems from the fact that when copying data from a user network packet, the handler uses the packet size specified by the user. The destination buffer is located in the stack and has a size of 1028 bytes. The user specifying a greater data size in the packet results in a buffer overrun. The executable has no stack overflow protection. Malicious actors can exploit the vulnerability to invoke a ROP chain and execute arbitrary code that opens remote access to the device.
Finally, we discovered SQL injection vulnerabilities virtually everywhere a string value passed by the user inside a network packet was directly inserted into a database query.
pushcomm analysis
As mentioned above, the pushcomm service sends requests to a server specified in the device configuration. To set up the server address, the administrator goes to the “COMM” menu and opens “Cloud Server Setting”. The administrator defines an IP address to connect to and a port, also enabling other options as required. The screenshots below show the configuration menu.

COMM menu

Cloud Server Setting menu
An analysis of the executable showed that it was prone to the same issues as standalonecomm. However, exploiting the flaws requires spinning up a web server and making the device talk to it. There is more than one way to do this: by changing settings in the database or the admin menu, or via ARP spoofing.
Note that one of the pushcomm commands is named “SHELL”, and it runs any commands on the device.
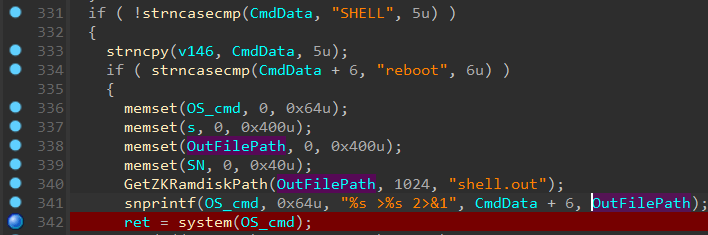
SHELL handler
All it takes to execute the command is spinning up a web server and implementing the following handler.
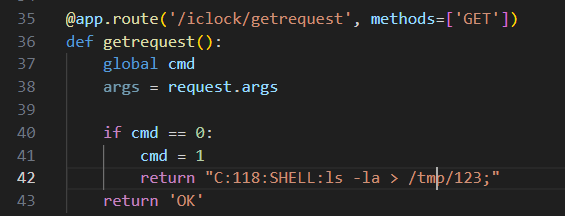
Example of a handler to invoke SHELL
Overall, there is considerable overlap between pushcomm and standalonecomm code, especially in terms of database queries.
QR code handler analysis
At the beginning of the article, we mentioned that the device authenticated us as a different user when we made it scan a QR code with SQL injection. However, as we analyzed the code, we found that the size of data that a QR code could contain was limited to 20 bytes. This prevents complex UNION and SELECT injections that can be used to obtain arbitrary data from various fields in the database. The database query that was generated when the device scanned our malicious QR code (code with SQL injection in our case) is shown in the screenshot below.

Database query when using the QR code
We also found that we could cause the device reboot by making it scan a QR code that contained a lot of data. Looking at the code, we saw this was due to a piece of code that was waiting on camera data being unable to receive it within a predefined period of two seconds and sending a “reboot” command in response to what it perceived as a malfunction.
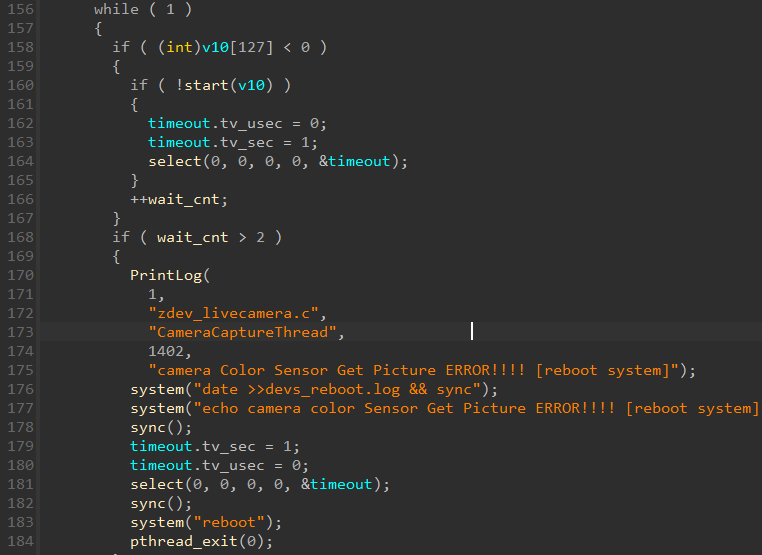
Camera data wait code
Conclusion
Biometric devices designed to improve physical security can both offer convenient, useful features and introduce new risks for your IT system. When advanced technology like biometrics is enclosed in a poorly secured device, this all but cancels out the benefits of biometric authentication. Thus, an insufficiently configured terminal becomes vulnerable to simple attacks, making it easy for an intruder to violate the physical security of the organization’s critical areas.
Our analysis of the ZKTeco biometric terminal yielded a total of 24 vulnerabilities. Many of those were similar, stemming from an error in the database wrapper library. We generalized these as “multiple vulnerabilities” and stated the type and cause, arriving at a smaller number of CVEs.
In terms of the cold statistics, the results are as follows:
- 6 SQL injection vulnerabilities;
- 7 buffer stack overflow vulnerabilities;
- 5 command injection vulnerabilities;
- 4 arbitrary file write vulnerabilities;
- 2 arbitrary file read vulnerabilities.
The descriptions of the vulnerabilities we detected are available in the Kaspersky research team’s GitHub repository.


QR code SQL injection and other vulnerabilities in a popular biometric terminal